War in the Woods Game 7: A Timely Rescue

Moving through the forest while avoiding detection by man or beast is as much about sound as anything else. The city-bound think it's all about snapping twigs, but the rustle of underbrush, the clanking of a metal canteen or the squeak of a piece of leather equipment can be even more crucial.
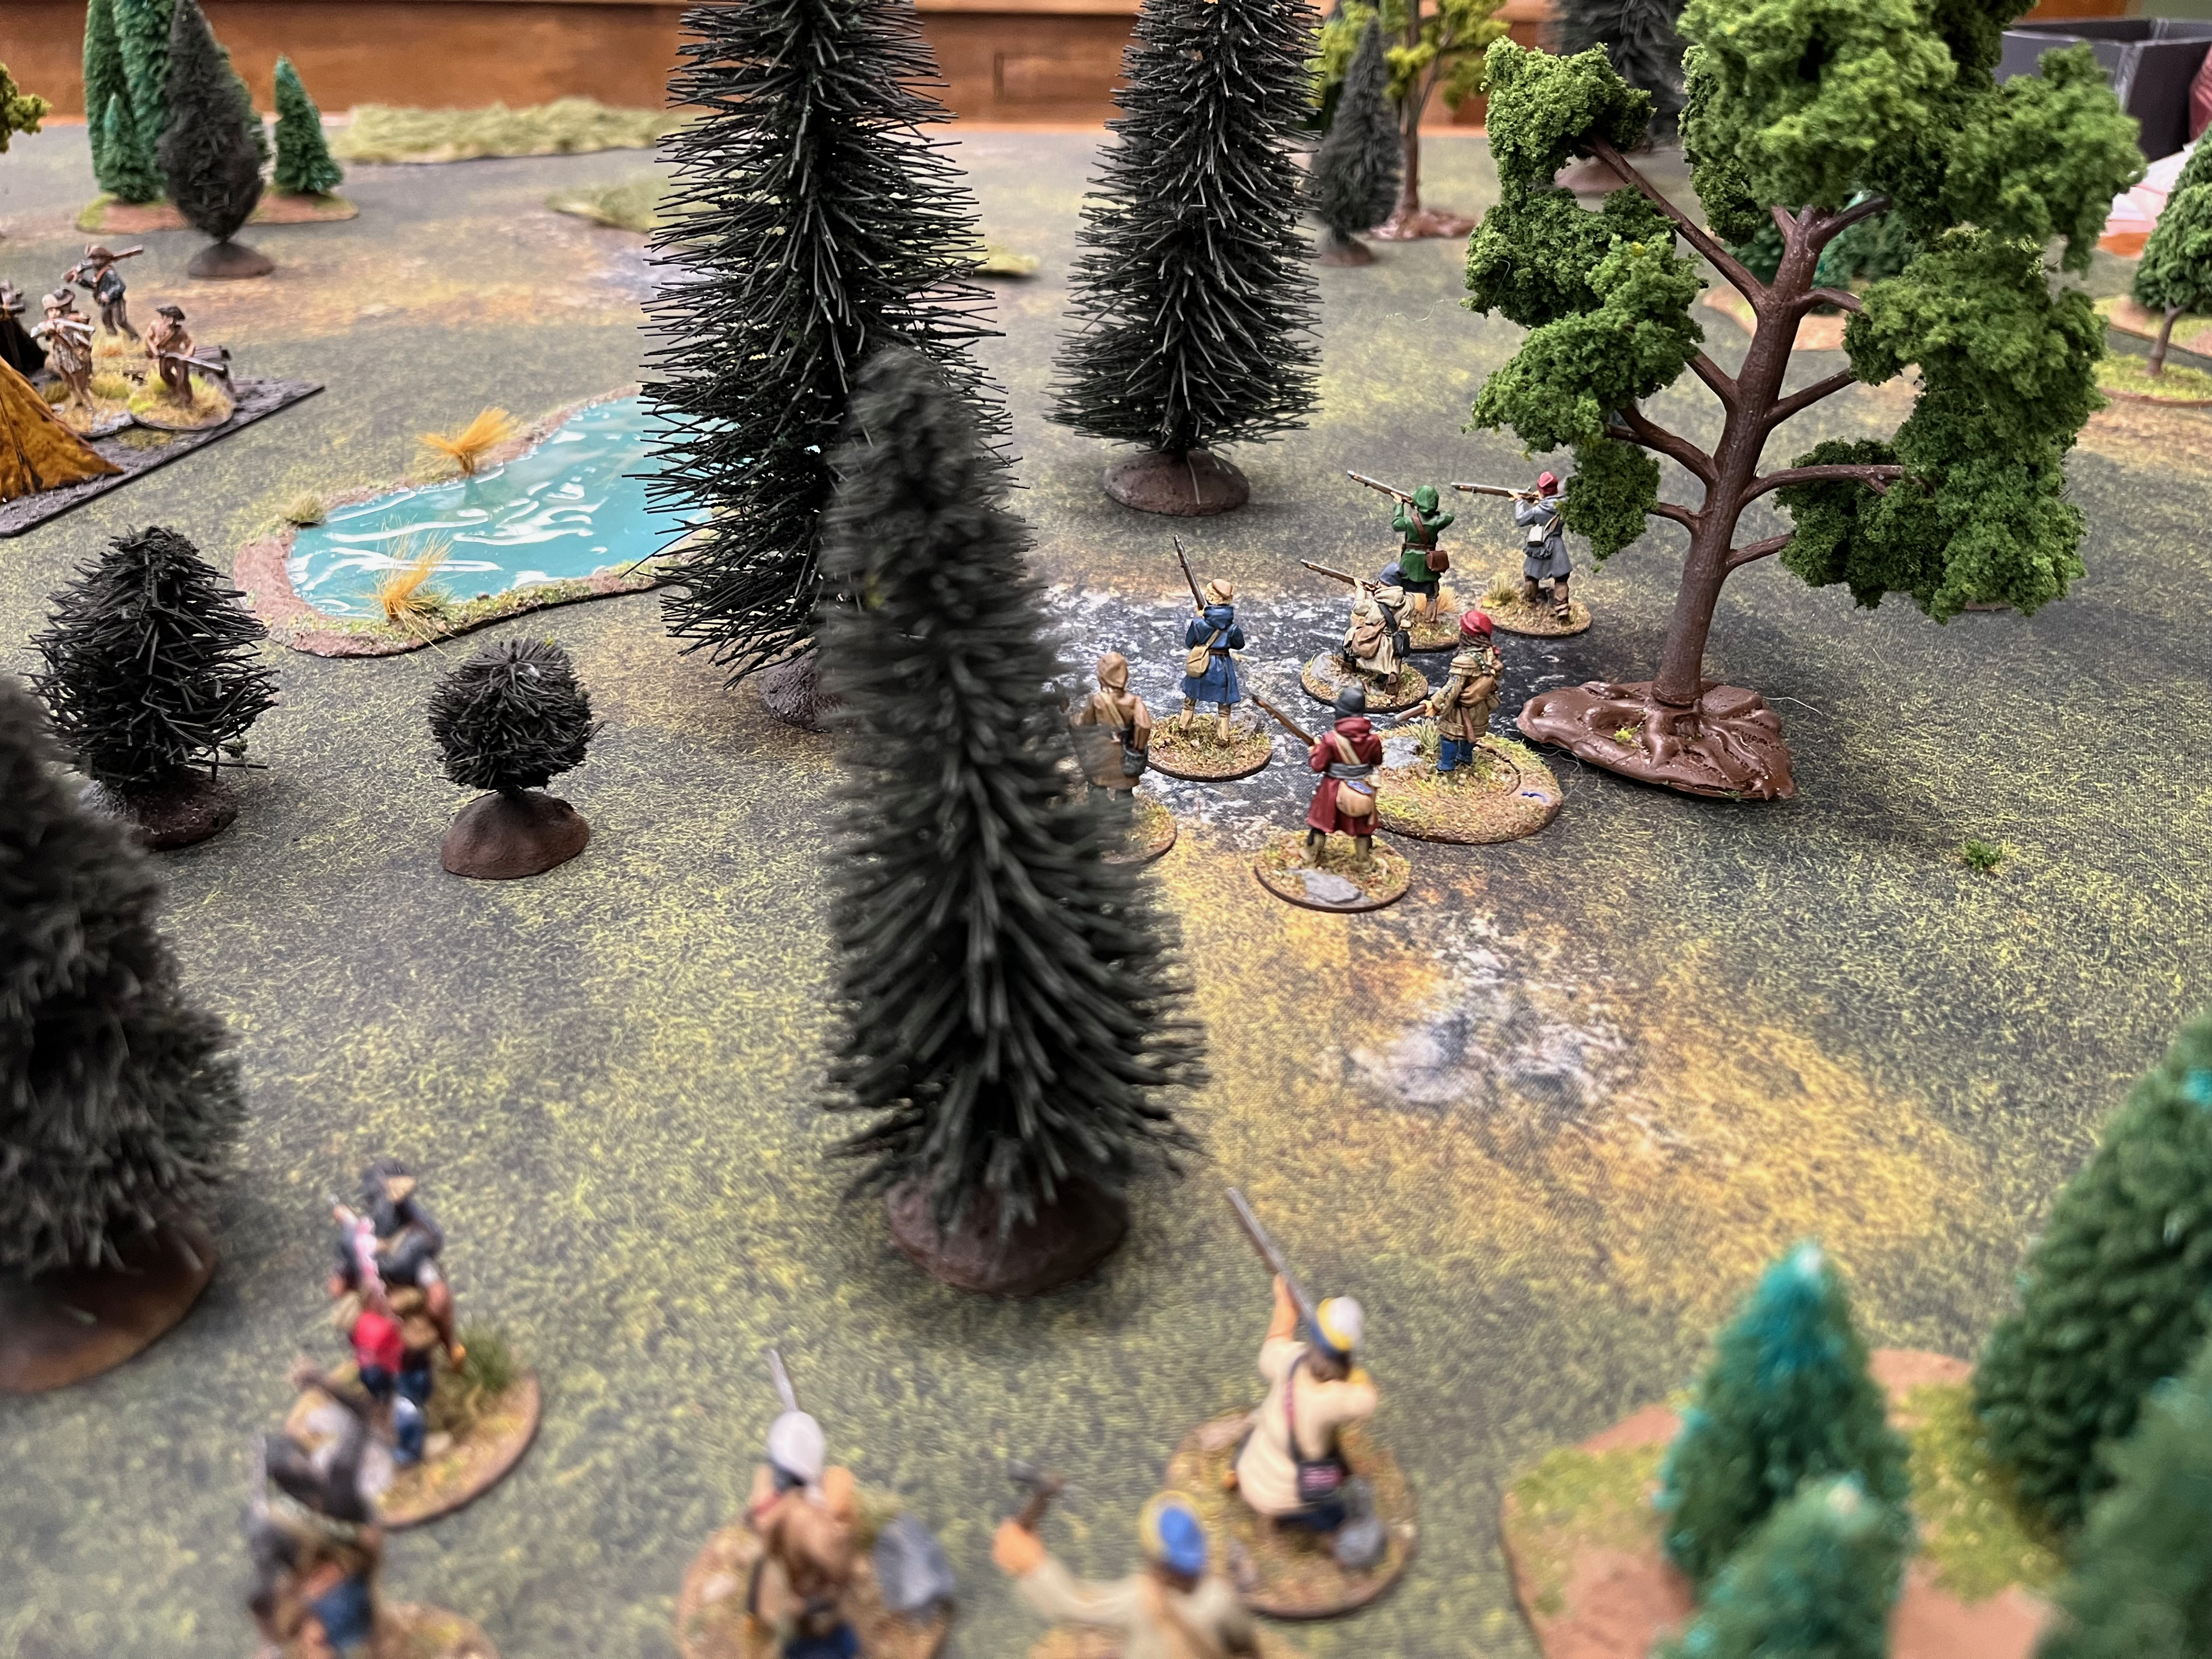
The men selected for the raiding party know this, be they Pelletier's milice or Hardheart's Huron warriors. Moccasin-clad feet pick carefully through the undergrowth as they close on the dim glow of the camp ahead. A few of the men even shield their eyes or avert their gaze to keep from spoiling their night vision.
In the camp, too, there are subtle sounds. The crackle of embers, the swish of liquor in the guard's bottle, the faint creak of the rope around a French officer's wrists.
Out in the dark, the Canadiens shake out into line with as much care as they approached with. Tremblay is the first to shoulder his musket, drawing a bead. The next sound is not so subtle - the click of a trigger dropping a sear, immediately drowned out by the fwoosh of black powder touching off.
A questioning of prisoners taken after the carnage near the French and Huron camps the previous afternoon has unearthed a crucial piece of intelligence: Enseigne Dujardin, thought slain in the opening raid at Little Eden, is alive and in the hands of the Anglo-American force.
Although Hardheart is nonplussed about the idea of a rescue mission - he'd rather fall on the enemy camp and commit a wholesale slaughter, with the rescue incidental - the sergeants Marleau and Pelletier are less than sanguine about the odds of the Huron sachem's plan going off without a hitch. They talk him into joining them with a small force to snatch the French officer back in the predawn hours.

In this game, we experimented with a few special rules, some of which we'd tested and others we hadn't. The darkness limited visibility (I foolishly didn't write down how much we decided, but I think 12 or 18 inches provided a unit hadn't fired and given their position away). The darkness lasts until dawn, and each time the tiffin is pulled we rolled a d6, trying to reach a cumulative total of 12, which would signal the arrival of dawn and the end of limited visibility.
The French had three units total, and the British started the game with two units available to perform patrols. They have three more groups - Mohawks, militia, and rangers - in the nearby woods acting as a reserve, but have to roll when those units' cards come out to see if they arrive. In this case, the roll was 1d6, looking for a cumulative total of 8.

Dujardin is captive near the center of the camp. There was, admittedly, a bit of suspension of disbelief on the part of my opponent, who knew the score but was unable to react with his on-table units until he'd caught sight of the rescuers or heard gunfire.

The game kicks off with the appearance of the Canadien militiamen alarmingly close to the British camp. Their sergeant, Pelletier, is an experienced fur trapper and backwoodsman with the experience to lead his less-trained men through the enemy pickets and to their objective.

On the opposite side of camp, a wood-gathering party under Jim Morgan tramps back toward the warmth of the fire with fresh fuel.

Hardheart and his Huron warriors creep up alongside Pelletier and his men, ready to steal into the camp with tomahawk and knife.

As the raiders close in, they catch sight of the burly highlanders gathered around the southernmost cookfire. Some are slumbering, or tending to wounded from the previous battle, while a few keep a half-hearted watch.
The turn ends, with time creeping closer to dawn, but things don't go the French's way when the Tiffin is drawn at the very top of turn two. This means we roll for the approach of dawn even though to rescuers haven't had a chance to progress. It's already halfway to dawn now. Evidently the stealthy approach that Pelletier and Hardheart chose cost them precious time.

Unaware of the interlopers creeping outside the camp, Morgan's party returns to the shelters and their captive.


Sergeant Marleau arrives and signals Pelletier's men to advance, but stay out of sight. This they do, and Hardheart also pushes up to the edge of the woodline, just out of sight of the British sentries. In the process, he manages to tread on something foul in the underbrush - an untimely random event - which ensures that his Huron won't be moving with their usual swiftness.
The British take no action this turn, and since no alarm has been raised they can't yet roll for the arrival of their reinforcements. Time, however, is against the rescuers, and when the Tiffin comes out, the total to reach dawn is up to 11. The next turn will be the last of pre-dawn darkness.


The Canadiens take the initiative firing a volley into Morgan's men from concealment. It puts just two shock on the militia skirmishers. Then the Tiffin card is pulled, and all of a sudden the jig is up for the French surprise attack. Morgan spots the Canadiens hiding in the trees and fires his musket in the air to raise the alarm.

The highlanders are roused and move in skirmish order to back up their militia comrades.


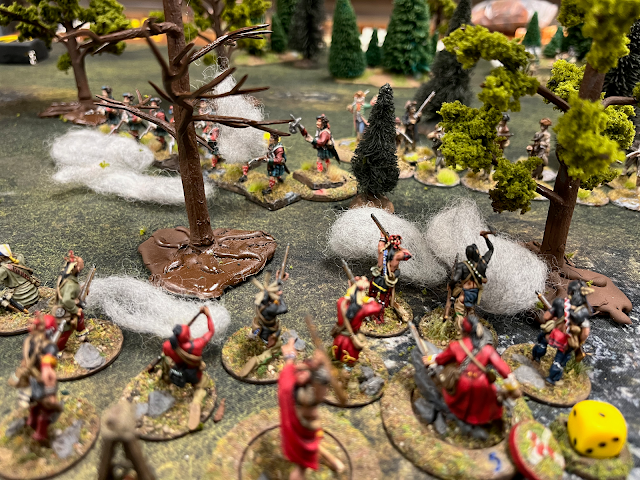
With the element of surprise largely gone, the French and Huron resort to violence of action - something they're usually rather good at. Both Hardheart and Marleau's men spring forward to volley the hapless militiamen. Musket balls tear through the camp, shredding canvas and flesh alike. Three militiamen are felled, and one of the rounds grazes Morgan painfully, wounding him enough to reduce his leader status. And there's another point of shock on top of that.
For those wondering, we did test to see if Dujardin was inadvertently hit by his comrades' firing. He made it through unscathed for now, although the same can't be said for British Force Morale, which falls from 10 to 9.
The upshot for the British is that the rangers are nearby and will be able to come into play starting next turn. The Mohawks aren't far behind, although Venderventer and his militiamen are slow to respond.


The highlanders are the first to return fire, putting some shock on the Canadiens. Sergeant Gordon with the highlanders orders Morgan's militiamen to grab the prisoner and get clear, which they do successfully, although their parting volley at the Canadiens is desultory and ineffective.
Moving with the prisoner is somewhat risky, as we've ruled that Dujardin has a chance to break free from his captors anytime he's forced to move. His wrists are bound but if they want him to move they'll have to free his legs, we figured.


The Canadiens fire back, but are unable to inflict anymore damage. The British player, desperate for reinforcements to keep the foe at bay, burns four Command Cards to activate the off-table Rangers again. They roll again and succeed in deploying on the far side of the camp. They're led by Captain John Thayer.

The next turn is brief and sees Marleau's men advance reluctantly under covering fire from the Huron, who have to shift to the side behind the pond to see the highlanders. They only manage to inflict a point of shock.


The Huron's next round of shooting is more effective, though, wounding Sergeant Gordon and reducing his leader status to Level 1. Two of the three British leaders on the table have been made casualties in the French raid, although British Force Morale isn't affected this time.

The sustained firing results in a pall of heavy smoke hanging over the pond in the misty dawn air. While this affords the French and Huron some cover, it's really not ideal, as it limits their ability to engage the British trying to flee with Dujardin in tow.

With Morgan wounded and at Leader Level 0, the British have to spend two Command Cards to move the militiamen and Dujardin further into the woods. It's still a good move, as it keeps the French further from their goal.

Marleau knows that time is of the essence, and his well-trained troops rush into the abandoned camp and engage the highlanders to their front. It's a bit of a desperate gambit, but spending three Command Cards to bump up the French shooting pays off somewhat when Sergeant Gordon is hit again and knocked unconscious.


With their leader bleeding and out cold, the highlanders suddenly decide discretion is the better part of valor and fall back at the double, actually outpacing Morgan's men with the prisoner. Maybe the use of line formation was helping keep the highlanders steady after all. They seem skittish in skirmish order. Fortunately, Gordon being hit again has still had no effect on British Force Morale. Either they're not that worried about the tough sergeant, or they really don't care if the bastard lives or dies.


The British burn a Command Card to try and haul Dujardin away, and while they are able to successfully retreat, Dujardin shoves his way out of the militiamen's grasp. He makes a break for his comrades, still bound and unarmed.

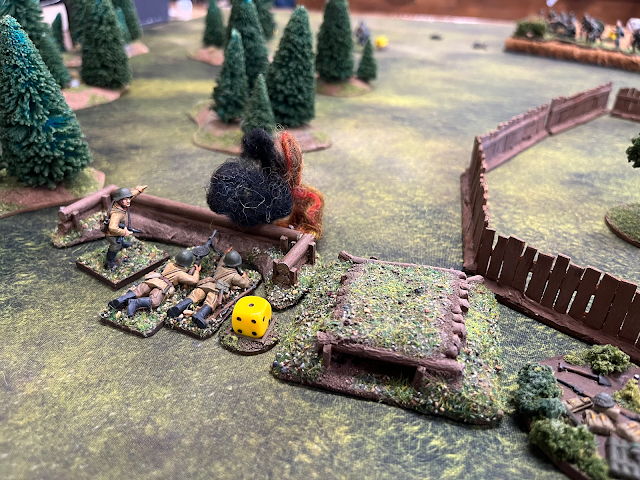
Sergeant Gordon fails to recover on his turn, but the Mohawks arrive on the British left flank. They engage the Canadiens, but fail to score any hits.


The rangers advance and fire at Marleau's men, using Command Cards to up their rate of fire. Their aim is true, and two French soldiers fall slain. The unnervingly accurate fire puts four points of shock on the group.

The Canadiens return fire at the Mohawk skirmishers, but fail to have any effect due to a pall of smoke created in front of the Mohawks by a random event. We forgot to mark it on the table.


Spending four French Command Cards brings the early activation of Marleau's men. The French sergeant rallies off two of their shock and they fire back at the rangers, killing one of them.
The next card is the Tiffin, and then there's a sudden pause in the battle as the Tiffin is the first card out of the stack for two turns in a row.


The bloodied militia skirmishers fall back under the screening fire of the rangers, and the Mohawks fire a volley at the French in the camp before retreating to the safety of the woods. The firing inflicts one shock on Marleau's men.


Despite their loses, Marleau's men make good use of the cover afforded by the abandoned British camp and put out a good rate of fire. Their volley kills two rangers and inflicts two points of shock on the dwindling remainder.

Dujardin's card was dealt into the deck after his escape, and on his activation he reunites with his men, miraculously unscathed by the withering fire going back and forth across the glade. Marleau, tomahawk in his other hand, clasps hands with his rescued officer after freeing him from his bonds.

At long last, Vanderventer and his group of militia skirmishers turn up. It's really no surprise it took the city boy the longest to get to the fight in the woods. He deploys his men near the Mohawks, hoping to creep around the French flank to inflict maximum casualties.


The British window is closing, however. The Huron near the pond fire, placing one more shock on the rangers, and then the Canadiens fall back out of sight into the woods in good order. The French are starting to slip away.


My photos get a little sketchy at the end, so bear with me. Huron fire on the the rangers kills one and inflicts another shock, forcing them to withdraw one inch. Thayer is able to rally three shock in short order, but he and his remaining men simply can't dislodge Marleau's men. It's harder now with Dujardin there to help rally shock.

When the Tiffin comes out, the French spend a command card and the light infantry run like hell. They're still taking some desultory fire from the British, but the rescuers are able to make good their escape without taking any further casualties.
So, the French were able to rescue Dujardin, restoring one of their valuable leaders in the campaign. When he was killed in the first game, we rolled to see if he was wounded and captured instead of killed outright. You see what's become of that. We also rolled for Sinclair, the highland leftenant, but he was not so lucky.
Despite losing the cover of darkness early, the cost for the French was minimal. Two of the compagnie de la Marine men were killed in Marleau's move into the camp, but everyone else made it out alright. by comparison, the British took a bit of a bloody nose, with four of their skilled rangers and three of their dwindling company of militiamen biting it.
As we continue into the last few games of the campaign, the casualties are going to continue to show. The French reclaim the initiative after this scrap, but the British are still strong despite the setbacks they've suffered, and the French can't afford to be too careless, especially in their camps.
Comments
Post a Comment