Breaking the Line: Eastern Front Chain of Command in 28mm

For our first game of 2024, Jesse and I returned to Chain of Command, which is probably our most-played ruleset. However, I wanted to introduce a bit of a twist by pitting him as the Germans against the Soviet fortified region machinegun platoon list. It pits a small but well-armed and dug-in Soviet force against a well-trained and well-supported German one.
We set our game sometime in July 1942 on the southern Russian front during Case Blue. Jesse took command of a rifle platoon from Fremery's 29th Motorized Division, while I had the Soviet defenders. In reality, the Soviets defending the approaches to the Caucasus oilfields crumbled reliably under the German advance, but we'll see how our match-up goes.
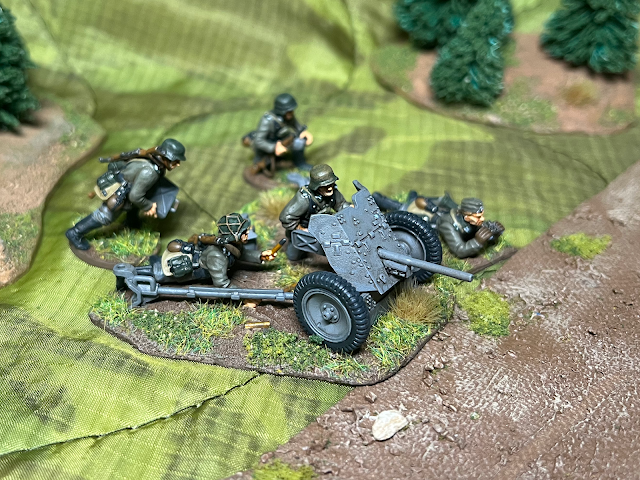
The Soviet list I'm using was created by Andy and shared on his TinyHordes blog. As far as I can tell, the blog is now largely defunct, which is a shame. As far as I can recall, I have only play-tested the list once before, which was fortunately captured on the blog.It consists of two squads and a leytenant, 13 men, armed with two Maxims and two DP-28 light machine guns. All units start entrenched, and all of their support options are based in the defense.
The German list is from the Too Fat Lardies 2016 Christmas Special, using the infantry platoon list alongside the support list from the panzergrenadier platoon. I don't currently have enough machine guns to accurately model the panzergrenadier list. It's a fairly standard three-squad rifle platoon. In my experience, the fourth squad available in the early war lists is very handy, but not necessary. It's the loss of the second Senior Leader that really costs you.
We're playing the Attack and Defend scenario from the core Chain of Command rulebook. Our table, with patrol markers out in their starting positions, looked something like this:


The Germans had two free patrol moves, but as the Soviets I advanced pretty swiftly and was able to keep the German patrols out of the village buildings. As such, their Jump-Off Points are forced back to the rye field and the table edge.

The Germans roll a 10 for their support points. This would usually allow the Soviets only half that for their support options, but because the German platoon (+4) has a higher force rating than the Soviet one (-4), the Soviets get to add the difference to their support points, giving them a massive 13 points. Papa Stalin smiles on his foot soldiers this day.
The German support will be seen later, but I'll say right off that the Soviets elect to pay one point each to upgrade both of the entrenched Maxim teams in their core squads to bunkers, three points to requisition a command bunker with field phone lines for their platoon leytenant, an additional Maxim MMG in a bunker, and an entrenched 45mm anti-tank gun.
The Germans start at Force Morale 9, while the Soviets are at FM 8.
Leutnant Hahn deploys with two of his squads on the German right flank.

It's only as I'm writing this that I realize that Jesse didn't have an adjutant to guide his troops onto the field, meaning that he should have had to roll for every unit deploying after that first squad. That's not such a big thing to forget, but it's only now, while I was sorting out what support he did have, that it dawns on me that he managed to purchase 14 points of support instead of 10. Not sure how that didn't hit me while we were playing.
Back to the point. Hahn has his men brass up the entire farmstead and treeline in front of them with covering fire, hoping to suppress any Bolsheviks unwise enough to oppose them. Pardon my lackluster covering fire markers, it's one of the tokens I haven't gotten around to making a nice version of.

In the Soviet phase, a Maxim machine gun in a bunker near the worker's dormitory responds by opening up on Hahn's first squad from the flank.


The big water-cooled gun is firing at effective range, but still manages to deliver some instant karma. Leutnant Hahn is the only German hit, and he's knocked to the ground wounded among the rye stalks, too stunned to give any further commands.
Having their leader injured almost immediately causes German Force Morale to waver, dropping two points to seven.

Unfortunately for the Germans, the Soviets have rolled a double phase, meaning the dug-in machine gun can continue to engage them. The gunners are able to inflict a point of shock on the MG-34 team and two on the riflemen.


The turn of the phase ends the Germans' covering fire — they're all ducking for cover as the Maxim rakes their position — and a Soviet squad takes advantage of the opening to open fire. Hahn's suspicion about where the Soviet line would be was right on, the covering fire just had little effect on the dug-in Soviets.


As a reminder, the Soviet squad structure in this platoon is one Maxim team manned by a skeleton crew of three men, a DP-28 team of two, and a Junior Leader with a rifle or submachine gun. Both teams start entrenched, and only the Maxim can be upgraded to a bunker.
The Soviets target the German second squad who are, conveniently, right out in the open. The fire kills one man from each team and inflicts a shock on both teams as well.

In the German phase, the second squad's Junior Leader thinks fast. He rallies a point of shock off his MG-34 team and has his men dash toward the trees to their front right to escape the withering fire. They move at the double and take some shock as the dash disorganizes them. The LMG team outpaces the rifle team.

A Panzer IIIF rolls down the rutted steppe road and engages the Maxim in the bunker that's giving the infantry so much grief.

The shell slams into the front corner of the bunker, sending splinters flying everywhere and buffeting the men inside with a shock wave. One of them is bleeding from his ears, but he's still able to feed belts into the gun. In Chain of Command, bunkers allow you to ignore the first kill result on the dug-in unit during a phase, so one of the Maxim crewmen has cheated death, for now.

The Germans roll up an LeIG18 infantry gun to the edge of the field to shell the Soviet squad. This is one of the few models I have a late-war version of but not a early-war model, so you'll have to forgive the stand-in. I also left my early-war crew at home, so this hodgepodge of figures will have to make do. I had to use one Soviet crewman, so we deemed him a Hiwi.

The 75mm shell crashes into the log-reinforced trench, but the gunners inside avoid injury, suffering only a point of shock.

The Soviets roll up another double phase, all but ensuring their reply will be unpleasant for the fascists. A 45mm anti-tank gun reveals its position dug-in near the end of the worker's housing when it fires off a round at the Panzer III.

The first shot's a winner, slamming into one of the road wheels and mangling it, splitting the track. The tank is immobilized and the crew takes two shock as they realize how much worse the result might have been if the Soviet gunner's aim was a little better.
It's enough to dampen the Germans' spirits, with their Force Morale falling another point to six.

The Soviets in the trench on the German right flank engage the infantry gun. Although the shield protects most of the crew, the Hiwi lugging ammunition catches a round and is killed.


The same squad fires again at the gun in the second Soviet phase, but this time with no effect. The platoon leytenant deploys behind the rearmost izba inside his command bunker. From here, the officer has a landline field phone running to each of the platoon's entrenched positions this means he can order the 45mm gun to fire again at the Panzer III.


With a resounding thump, the gun's breech recoils and a round whistles on its way across the field. At this range, it smacks into the fascist tank faster than the blink of an eye. There's a godawful clang as the shell finds a weak spot in the tank's armor (double sixes on the hit roll). It wedges between the turret and hull and sends spalling bouncing around the interior of the crew compartment.


The surviving crew bail out and flee. German Force Morale falls another two points, falling dangerously to four. If they drop lower than three they can't win under the scenario rules.
The Soviet leytenant also orders the Maxim bunker near the AT gun to fire at the German infantry, but it has no effect.
In the German phase, another tank rolls onto the battlefield, this time a Panzer II. These light tanks were very much still in German arsenals by the time of the 1942 summer offensive, but were growing more and more obsolete against forces with modern tanks and anti-tank weaponry.

The 20mm autocannon mounted in the light tank's turret spits hate at the entrenched Soviets, inflicting one point of shock on the Maxim crew and lightly wounding the Soviet squad leader. It's enough to reduce Soviet Force Morale by one point, to seven.

Another shell from the infantry gun puts another point of shock on the men in the bunker crewing the Maxim, but a smattering of small-arms fire from the German infantry has no effect.

The second German squad makes use of the suppressing fire to move into the woods, regrouping slightly as they set up the flank the Soviet position despite their early casualties.

In the next phase, the Soviet Senior Leader first orders his anti-tank gun to engage the newly arrived light tank. The tank is hit by the first shell, but the German steel somehow bounces a side-on shot without suffering any ill effects.


Next, the leytenant uses his field phone to order the Maxim to fire at the German infantry in the rye field again. The gunner picks off one of the MG-34 team's ammo bearers and puts a point of shock on the team.

The Soviet officer also orders the squad to his left to engage the German infantry instead of the infantry gun with its bullet-resistant shield. They put another shock on the LMG team and two more on the rifles. The wounded Soviet Junior Leader belatedly pulls a shock from his Maxim crew.


So far, the Germans have taken a beating and have little to show for it. Leutnant Hahn remains out of action and Jesse really has no way to stir him without the fortune of rolling up an end of turn. In the German phase, the Junior Leader of the second squad brings his men further through the forest, apparently intent on a flank assault to clear the deadly Soviet position. The denseness of the pines prevents the Soviets from detecting and firing on them for now.


A third and final German squad deploys, close to their allies in the rye field and the knocked-out Panzer III. They fire at the anti-tank gun, which has now thoroughly revealed its position, and manage to pick off one ammo bearer.


Back in the Soviet phase, the leytenant keeps up the good work, making sure all of his troops are keeping up their fire on the fascist invaders. He has the 45mm gun fire at the Panzer II again, inflicting one shock and rattling the gunner badly enough that he won't be able to do his job for the next phase.


The lone Maxim on the Soviet right flank fires at the newly arrived German squad, but the gunners are adjusting their weapon and can't quite get the bearing. The squad on the left flank, however, has no such troubles. They kill a rifleman from the German first squad and Leutnant Hahn is misfortunate enough to be hit again while lying prone on the ground. He's lightly wounded, and it's enough to drop German Force Morale to three, putting them on the edge of defeat.

With their Senior Leader still out of action and reduced to three command dice, the Germans have a hard time getting much done. The fresh German squad lays covering fire on the AT gun, hoping to disrupt the Bolshevik gunners' aim and prevent them knocking out a second tank in this fight.


And it works, too. When they try to engage the Panzer II a third time, their aim is off and the shot flies wide. However, the Maxim in the bunker has found the range and cuts down one of the German infantrymen in response.

The wounded Soviet squad leader steadies his men, pulling a point of shock from them before the leytenant orders them to fire at the beleaguered German first squad. The volley is enough to pin them, killing a member of the MG-34 team and putting a shock on each team.


The next German phase is their last shot at snatching victory from the jaws of defeat. The young squad leader who has been pushing his men up through the woods is finally in position to make an assault. They have to use 3d6 to reach the Soviets for close combat, and they don't have enough movement to get around the rear of the trench or the rear of the bunker. Because the bunker can only be assaulted from the rear, the German squad, with eight men remaining, will fight only the two-man DP-28 team and the wounded Junior Leader in this melee.
The Germans fling hand grenades as they charge with fixed bayonets, and- I forgot to take any photos of the actual engagement. I was too distracted tallying up the fighting dice — 11 for the Germans and 16 for the Soviets — and forgot. I'll try to paint a picture for you anyway:
Serzhant Antonov, his left arm crippled by a fascist autocannon shell, jerks his head to the left as he hears the hurried thump of jackboots and a yell in a foreign tongue. A stick grenade sails over the parapet of his trench, landing amongst the piles of brass shell casings. The blast instantly kills the loader of the team's DP-28, a young collective farmboy.
A fascist soldier springs over the edge of the log trench and Antonov swings his submachinegun up, squeezing the trigger and filling the landser's guts full of lead. The German's comrades follow, swarming the trench.
Efreitor Sokolov rises to his knees, hefting the DP-28 at his hip and firing into the Germans rushing into the trench. A German draped with MG-34 belts crumples and dies while the top of another's head is blown out the back of his helmet. Two bullets stitch across the fascist non-commissioned officer's arm, preventing him from using his MP-40 on the Soviets.
A German bayonets Antonov, who goes down, firing his submachine gun until he's clubbed by another German rifleman. Sokolov takes care of Antonov's killer but is wounded himself in return. Bleeding horribly, he stands his ground, firing the light machine gun until the pan runs empty.
In the end, the Germans lose by three. The Soviets are few in number, but the Germans were carrying shock and assaulting an entrenched position with an automatic weapon. Frankly I can't believe it wasn't a German victory in the assault, even if the result broke their Force Morale.
The Germans wiped out the Soviet LMG team and killed the Junior Leader, but in return the Russians killed four of the attackers, wiping out the LMG team and wounding their Junior Leader. The survivors break and run, too panicked to realize the trench was cleared.


The wounded German Junior Leader manages to keep his survivors from breaking, but it's too much for the teetering German Force Morale to bear, and they throw in the towel on the assault.
Jesse as the Germans had some bad luck here, but I think this game and the other I've played with this list demonstrate the power of the fortified region list. The bunkers are really nothing to sneeze at, even with just three men inside.
I think it's possible that the force rating may need adjusting, or some other mechanical modification. Like I said, I'm not sure how much Andy play-tested the list. Perhaps giving the attacker additional free patrol moves to reflect the static nature of the list's troops?
However, I maintain that I don't think the list is hopelessly overpowered. Having just two squads means the Soviet player has very little flexibility, and if one squad is neutralized I think it would quickly become a disaster. They just can't cover the whole table.
If you look at the first game using this list, I don't think Alec had the necessary support to take it on. He had very little high explosive to reduce the cover of the dug-in Soviets. He also more or less came directly at me with little in the way of a base of fire.
Jesse had a more effective base of fire and more HE, and even managed to get a squad around a flank, but was plagued by bad rolls and lost the firepower battle.
I do wonder if a player attacking against this list is actually at an advantage with a lower support point roll. That's what gave me the ability to add manpower to close the gaps in my line, give myself flexibility with the command bunker, and add effective anti-tank firepower.
I'd like to reverse the roles soon to see if I can put my money where my mouth is and tackle the tactical problem presented by this list.
Very interesting - and I look forward to the rematch!
ReplyDelete