Got down to the local gaming store Sunday to play a game of Chain of Command. My opponent, Alec, was generous enough to let me text out an experimental list for my Soviets.
I was using the Soviet Fortified Region platoon list written by Andy over at TinyHordes. I'm not aware of how much Andy has tested it, or what results he's had. I certainly haven't seen any battle reports.
"Strong in artillery and machine guns and weak in riflemen, the fortified region was used as an economy of force minor formation for purely defensive tasks such as the holding of passive sectors or the flank of a penetration."
- Charles Dick, From Defeat to Victory
Essentially, the platoon is two squads with a Maxim MMG and a DP-27 LMG each - 13 men total. They start entrenched, and that's factored into their force rating, and have a lot of defensive support options like bunkers and artillery. No tanks, not a lot of infantry. I highly recommend you check out Andy's full post on the force list.
Against this unique defensive force, my opponent has a full 4-squad German rifle platoon from the Chain of Command 1940 book. By 1942, when the fortified region units were organized and when we set our game, this would have been a rarity. Most German units were already hurting for manpower and trained leaders. This is a strong force, and in this time period I think the only unit more powerful would be the early panzergrenadier units, with two LMGs per squad.
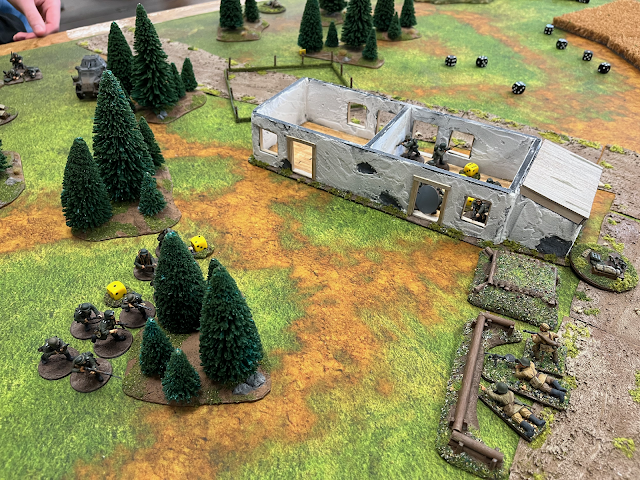
This photos shows most of the battlefield: two larger worker houses and a cottage on the Soviet side, screened by a patch of pine forest that straddles the main road. The patrol phase went well enough for the Soviets. The Germans got two free moves and managed Jump Off Points in the woods near their table edge on either side of the road. The Soviet JOPs are positioned at the edge of the woods on the left, behind the center worker dorm, and in the cottage on the right.
My platoon has a -4 rating as regulars, the Germans a +4 rating, so I got 12 points of support to the attacking Germans' 9.
The Soviets started at 11 Force Morale, the Germans at 8.
Soviet Support Picks:
- Upgrade squad MMG team to bunker x2 - 2 points
- Command bunker for Senior Leader - 3 points
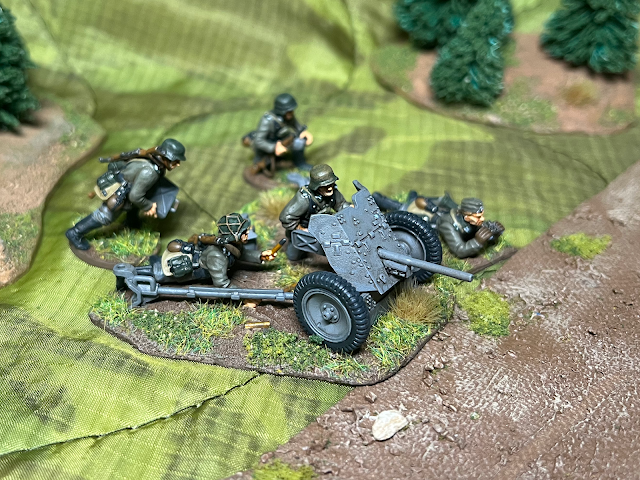
- Entrenched 45mm anti-tank gun - 4 points
- Sniper - 2 points
- Minefield - 1 point
I placed my mines right on the main road, hoping to divert German attention to the flanks. In hindsight, I might have done better to mine the woods on either flank to force them to one side.
German Support Picks:
- SdKfz. 222 armored car - 5 points*
- Pre-game barrage - 2 points
- Medic - 1 point
- 2 extra SMGs for a squad - 1 point
* We used the 1940 platoon list, but the Eastern Front 1942-43 support list from the 2016 Too Fat Lardies Christmas special, which excludes the 222 from the infantry list but allows it at 4 points on the recce list. We both wanted to get the model on the table, so we decided to allow the infantry to have it at one point extra cost
The Germans kicked off the assault with a double phase, bringing on a squad on either side of the road and the 222, which quickly gets off the road to go around the mines. The squad nearest the 222 is packing the extra SMGs.
I'm concerned about the effects of the barrage. I don't have a lot of men and I'm worried the Germans are going to rush in and overwhelm me. I need to start firing early while limiting return fire as much as possible.
I deploy a squad on overwatch along one side of the central worker dorm, giving them a view to cover the woodline on my center left. It's made up of a Maxim in a bunker, an entrenched two-man LMG team, and a Junior Leader. As I understand it, the LMG team cannot be upgraded to a bunker. They are on overwatch.
I try to deploy my sniper, but he doesn't manage to come on through the barrage.
In the German phase, their first squad makes a break for it across the open field, confirming my suspicion that they're trying to rush me while the barrage limits my deployment. Fortunately, they don't get too far, slowed by the forest.
Unfortunately, in the next phase I can't get a squad on to shoot them up, and my sniper is still nowhere to be found. The German barrage is doing its work.
In the German phase, the squad in the open starts to move toward the center building, and the other squad advances through the woods, keeping out of sight of my troops.
In my phase, I manage to get my second squad on, opening fire on the Germans in the open. Unfortunately, they only inflict one point of shock. Not exactly the slaughter I hoped for.
In other news, my sniper is still MIA. I try to deploy my AT gun on my left flank, hoping to offer some protection to my JOP on that side now that both of my squads are deployed and the 222 is roving through those woods.
The Germans in the open keep on running, managing to make it into the building right next to the first Soviet squad. Without a lot of options, I fire my overwatch, hoping to do some damage before they can hit my fortifications with grenades.
Eleven hits manage to kill a man from the LMG team and put one shock on that team and three on the rifles. Between the rush to cover and the warm reception from the Soviets, this squad is in some disarray.
In the meantime, the German light mortar comes on at the rear of the table.
In the Soviet phase, the platoon
leytenant gets to work in his command bunker to the rear. The command bunker allows the Senior Leader to communicate with the other positions in the platoon using landlines.
Cranking up his field phone, the officer orders both squads to fire at the Germans in the workers' dorm, hitting them from both sides at effective range.
The Soviets closer to the enemy fire first, putting two shock on the rifles and knocking out the Junior Leader. This is enough to pin the squad. The other Soviet squad, in front of the thatched cottage, can only see the German rifle team, but their fire is ineffective as the pinned Germans go to ground in the building.
The wounded leader drops German Force Morale by 1 point, to 7.
Sadly, the sniper still fails to come on.
The Germans get a command roll that's mostly 5's and 6's, leaving them with very few options to respond. The other German squad moves to the edge of the woods, likely hoping to take some heat off their pinned comrades.
The Soviets are happy to oblige. In the next phase, the Senior Leader has one squad fire at the newly arrived Germans, killing a rifleman and putting a shock on the rifle team and two on the LMG team. The few Soviets are still able to put out a lot of fire with their machine guns, and at this range the Junior Leader is contributing fire from his PPSH.
The other squad keeps up the fire on the Germans in the house, the chattering Maxim cutting down a German rifleman as the Soviets rake the building with fire.
The sniper and AT gun both fail to come on in the meantime.
A third German squad comes on, but they're a ways back through the woods. The Germans have yet to commit either of their Senior Leaders.
The Germans in the woods return fire on the entrenched Soviets. The MG-34 and extra SMGs get them up to 17 shots, and nine of them hit, but the fortifications save the Soviets from even any shock.
The Soviets don't let up, keeping the hate headed downrange. The Germans in the woods lose another rifleman and take two shock on the rifles and three on the LMG team.
The other Soviet squad is having more trouble whittling down the pinned Germans in the building. They get the benefit of hard cover, and the Ruskies only manage to put on one shock.
The sniper and AT gun finally arrive, but I notice as I write this that I made a mistake - with the barrage in effect and the Senior Leader deployed, I should have rolled twice to see if they came on. I hope my opponent will forgive this mistake, as it definitely cost him.
The sniper deploys in an upper window of the thatched cottage and picks off a rifleman from the German squad pinned in the house.
The AT gun deploys entrenched on the flank of the Germans in the woods, putting an HE shell into them that kills another rifleman and puts a shock on each team, pinning them.
In the German phase, the third squad moves up through the woods, heading toward the sound of gunfire, and the Junior Leader with the pinned Germans in the woods pulls some shock, hoping to un-pin them at turn's end. The Germans have had a lot of 5's and 6's in their command rolls, limiting their activation options. They also have no Senior Leaders on the board, so their 4's have been wasted.
In the Soviet phase, the platoon leader on his field phone keeps the orchestra of violence moving, having both machine gun squads and the AT gun fire.
In the woods, the pinned Germans lose two men from the LMG team and take another shock on their rifle team.
In the house, the situation is more dire. Concentrated Soviet fire breaks the squad, sending them fleeing out into the woods in front of the armored car.
German Force Morale drops one point to 6.
The Germans, needing to reinforce the faltering attack, bring on a fourth squad and advance the 222.
The armored car's autocannon fires at the dug in Soviets, hoping to root them out. Unfortunately it's all 1s and 2s on the dice, so the fire has no effect.
The German platoon leutnant comes on, looking to take the two fresh squads in and break the Soviet line.
The Soviets interrupt with a Chain of Command die, firing again at the pinned Germans in the woods. The fire wipes out the LMG team and kills another rifleman.

German Force Morale drops one point to 5.
In the Soviet phase, the Soviet machine guns savage the pinned Germans again, picking off another rifleman and knocking out the Junior Leader. This breaks the squad, sending them fleeing.
The wound on the JL has no effect on German Force Morale, but the team breaking does, dropping it two points to 3.
The scenario, Attack and Defend, specifies that if either side's morale falls below 3, they must withdraw. I didn't remember this until later and my opponent didn't know, or else he might have been spending more of his CoC dice to ignore the Bad Things Happen rolls.
With the immediate threat dealt with, I have to decide how to pivot my forces to counter the remaining Germans, who seem to be working up a flank attack. I can take my men out of their entrenchments, but I feel sure the few Soviets will be shot to pieces.
The AT gun turns slightly and goes on overwatch, awaiting a German assault through the trees. We ruled that the advancing Germans were out of sight because of the depth of trees.
The German armored car fires on the Soviet trench line again, putting one shock on the LMG team - my first shock of the game.

The German officer leads his men out around the cabin at the double while the other intact German squad edges around the other side of the building.

With other no targets left to fire at other than the impervious armored car, the Soviets fire at the fleeing German first squad, killing a man from each team and putting two shock on the LMG team. They are the proud owners of an impressive amount of shock - 17 on two men and a stunned leader.
The Soviet sniper fires at the light mortar, but it has no effect.
The 222 keeps up the fire on the Soviets, but has a hard time getting through the well-prepared defenses. The German SL keeps his men moving around to flank the AT gun, using the trees for cover.
The Soviets roll up three 6's - a double phase and an end of the turn. The Soviets put some more fire on the broken squad, but it doesn't matter much, as both broken squads flee the field at the end of the turn. The Germans play a CoC die to ignore one morale roll, but the other drops German FM down to 1. This would end the game, but neither of us realized the scenario rule and my opponent wanted some revenge with his flanking force.
The Soviets roll another double phase, giving them time to try and prepare for the flank attack. The AT gun goes back on overwatch and the sniper puts two shock on the light mortar.
In the German phase, it's finally time to assault.
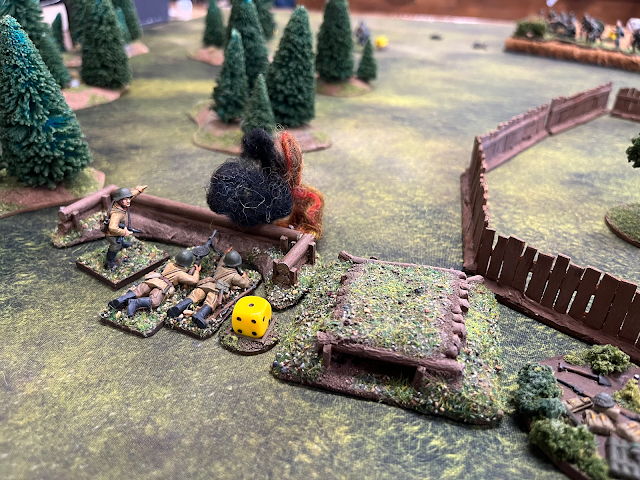
The German third squad launches a charge, leading with hand grenades and following up with the bayonet.
Two grenades practically disintegrate one of the Soviet gun crew and slap on three points of shock. The gun fires its overwatch as the Germans rush in, but they miss completely in their terror.
The Soviets have 9 dice in the melee against the German 17, and they manage two kills, but the Germans seize the gun pit with relative ease, wounding and capturing the Soviet Junior Leader in charge of the gun.
I play a CoC die to ignore one Bad Things Happen roll, but Soviet FM still drops one point to 10.
The Soviets roll up another double phase and end of turn, and the Soviet Senior Leader makes a break from his bunker, not wanting to get stabbed by Krauts.
In a bizarre series of events, the Germans interrupt and wound him, stunning him. This drops Soviets Force Morale by two points to 8.

But the turn ends immediately after and he gets back up, managing to make it almost to the next Soviet position in the following phase.
Antics aside, my opponent decides he does not have the momentum to continue and concedes the game. I breathe a sigh of relief, because I wasn't confident about getting my force turned to counter the flanking Germans.
I had a lot of fun with this game, our mistakes aside. I hope my opponent doesn't feel like I beat him too hard. I think it mostly came down to the Germans attacking piecemeal, one or two squads at a time. Even the assault on the AT gun pit was only one squad. If he had used two squads, he might have avoided casualties altogether. I tried to offer some pointers on tactics, but I think his support was good. The barrage really gave me trouble. If he had combined that with a two or three squad rush and a solid base of fire from the 222 and one squad, I think I would have been done for.
A few thoughts on the fortified region list: It has a lot of firepower, and the support options are well tailored to the play style. I think the command post is almost essential, and the MMG bunkers are a must-have. Note that the SL cannot remove shock via field phone, so if the Germans had dumped shock on my men, I think they could have been in trouble. Frankly, I think one of the main flaws in the German attack was that they did very little shooting. I think I only took four or five rounds of shooting on the squad near the center of the table, and the other never got shot at. The bunkers are incredibly strong, but offer a limited field of fire.
The force definitely lacks flexibility. When the Germans get around your flank, it's probably time to run. And with just two squads, it's hard to cover your flanks. One JOP was almost completely exposed, protected by just an AT gun. I think this platoon would shine in more open steppe combat. This table offered the Germans room to maneuver out of sight, and when it worked right, you saw the deadly effects.
I would be really interested to play this platoon in a campaign, where it would be ideal to give the enemy a bloody nose, damage a squad or two, and then run away when things get difficult.


Great AAR. An interesting unit to field.
ReplyDeleteAre rifle squads available as support for the Fortified region? 1 (or even 2!) of those as supports might have been an interesting surprise to drop on flanking forces, but at the cost of your sniper and probably one of the bunkers (or the AT gun).
ReplyDeleteI don't think the mistake with the bombardment and the SL were too greivous, as essentially you had a CoC die to spend to end the bombardment, it's just you'd have been one BTH roll worse off