Last Saturday was Virtual Lard 5 - the Too Fat Lardies community's answer to pandemic gaming restrictions. I played in VL4 back in January and was lucky enough to join a game of CoC hosted by Marc Renouf, who wrote a Pint-Sized Campaign set during Operation Crusader.
The game was played through Zoom, so my ability to get photos was somewhat limited, and I have used some taken by Marc to supplement. We had multiple cameras set up and it was surprisingly natural to see the table, so major kudos to Marc for his stellar hosting.
This scenario takes us to Libya on Sunday, 23 November, 1941, during Operation Crusader. The Germans of 15. Panzer-Division are fresh off the victory of sacking the British 4th Armored Brigade's headquarters the day before and are wheeling south to join up with Italian armored forces, smash the remaining British forces in the Sidi Rezegh area, and bring Operation Crusader to a grinding halt. On the morning of 23 November - a German protestant holiday called Totensonntag or Sunday of the Dead - the German tanks slashed across a supply column from the 1st and 5th South African Infantry Brigades in the middle of open desert. The result was a knife fight at surprisingly close range in a swirling cloud of dust and smoke.
Myself and my ally, Geoff, commanded a tank platoon from 15. PD's 8. Panzer-Regiment - three Panzer III G's, a Panzer IV D, and a Panzer II F, supported by a squad of panzer-schutzen mounted in an Opel Blitz truck. Our forces were rated regular, but to represent their fighting experience, any single '6' rolled on the command dice would give us a Chain of Command point, in addition to the usual '5'.
Our opponents, Graham and Wil, commanded a rear echelon South African infantry platoon, rated as green troops. Two Senior Leaders, three rifle squads, a light mortar team, and a Boys anti-tank rifle team. They had a 2-pounder anti-tank gun as support. Unbeknownst to us, the South Africans were under the effect of a special rule that forced them to deploy as soon as possible if they had the command dice to do so.
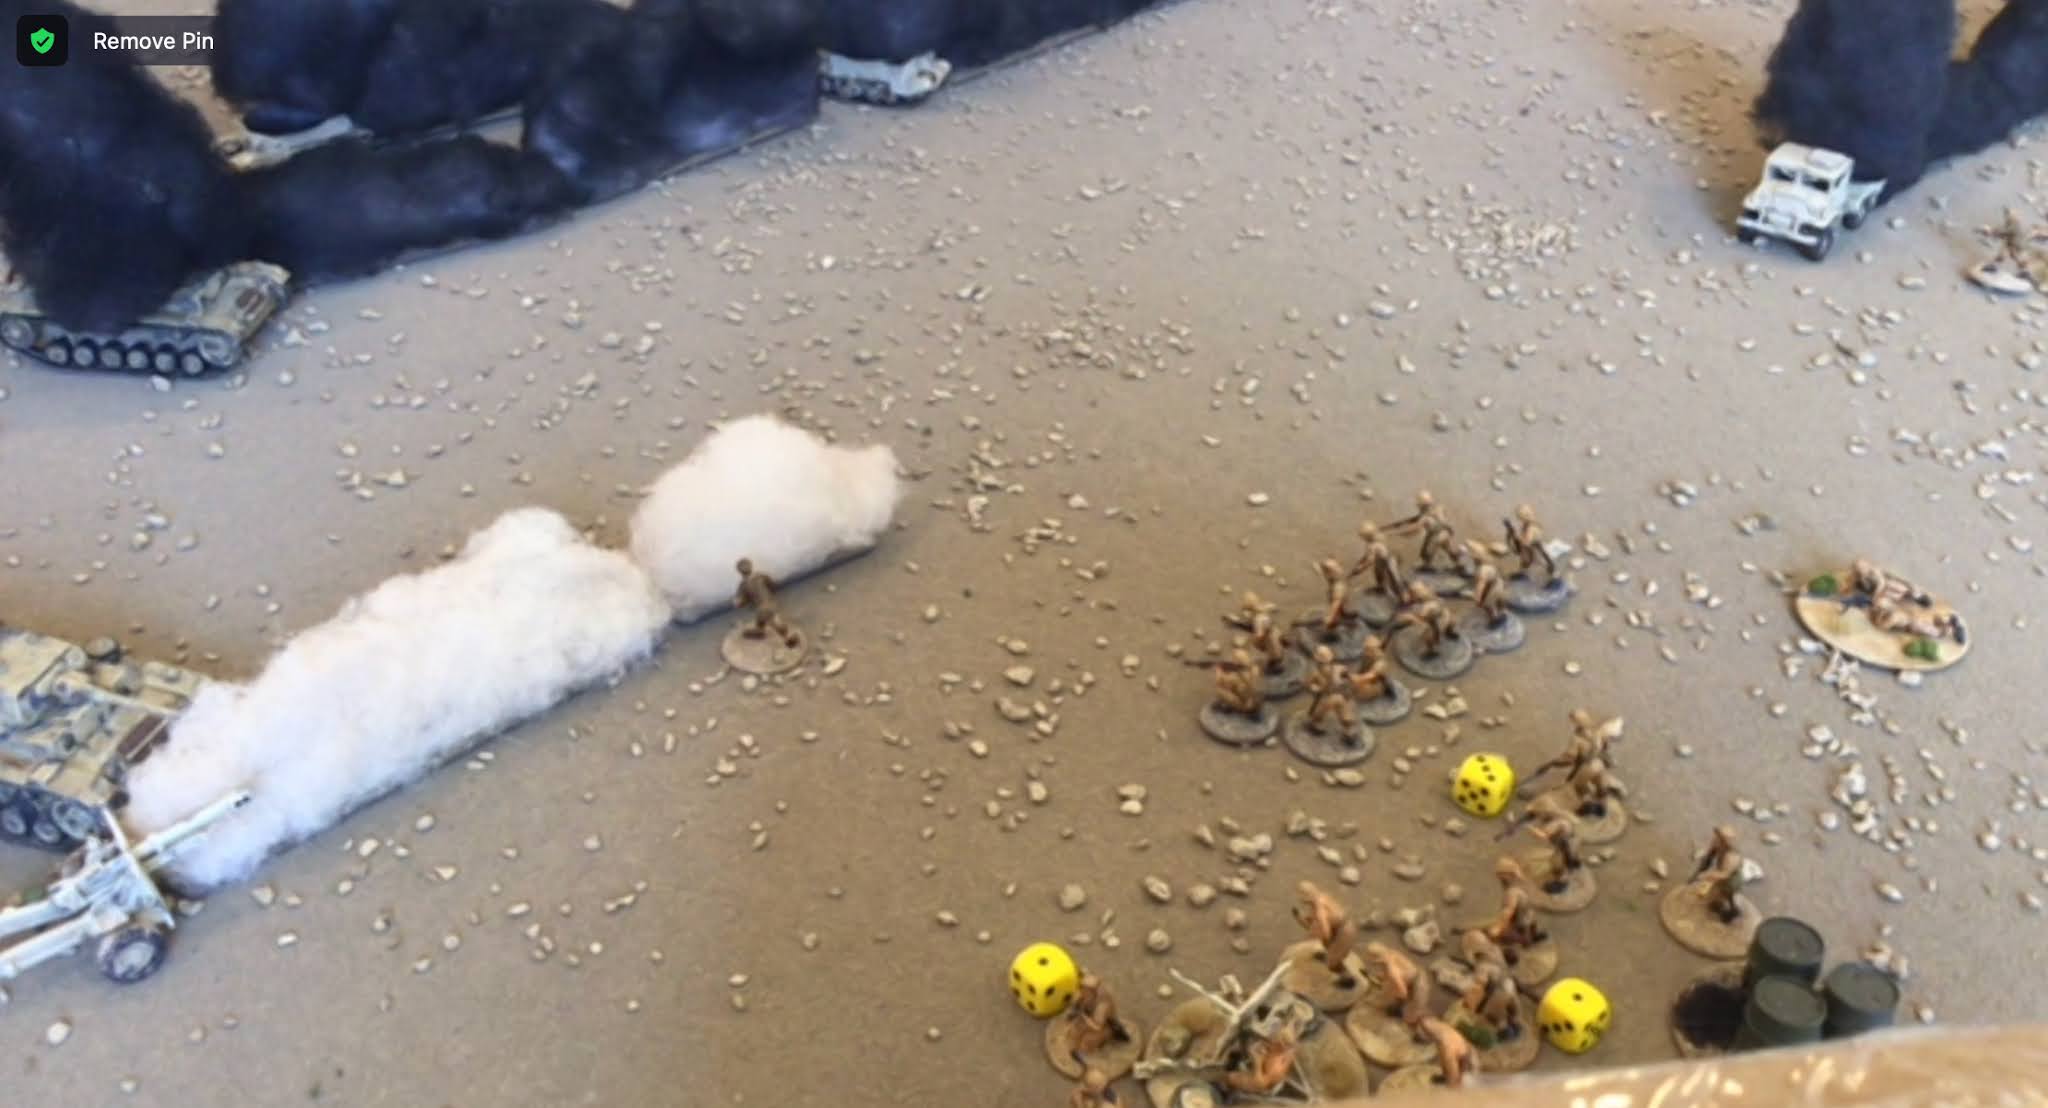
This was the battlefield that greeted us - a flat open desert already strewn with burning South African vehicles. The large black smoke plumes would heavily obscure targets on the other side, giving a -2 to-hit penalty for infantry fire. Two intervening smoke plumes would fully conceal the target from view. Any moving vehicle would kick up a dust plume in its wake which would partially obscure targets, or a -1 to-hit for infantry.
The scenario is Hasty Defense, from the CoC 1940 Handbook. The German patrol markers are in a stack on the southern table edge, closest to the camera. The South African markers are in a stack near the western edge, behind the truck towing a 25-pounder artillery piece.
The major scenario objective was for the South Africans to move three trucks - a fuel truck, an ambulance, and the truck towing artillery - off the eastern table edge. The Germans had to capture them by moving within four inches, menacing them with a weapon to stop them, then placing an infantry team in control of them and ending the turn to remove them from the table.
 |
| End of the patrol phase |
The patrol phase went excellently for the Germans. Our Jump Off Points had to be on the table edge, but we were permitted to deploy them on the eastern table edge, where the South Africans needed to escape. We sliced across the front line and succeeded in getting two JOPs on the eastern edge and one on the southern. The South Africans got two on the northern edge and one near the artillery tow truck, forming a sort of corridor along the top board edge.
When the patrol phase finished, we rolled to see if we would re-do it now that the South Africans had a better idea of what they were up against - but the dice favored the Germans and we played on.
 |
| You can just make out the South African patrol markers here, and the three objective trucks |
The South Africans rolled higher for Force Morale (8 vs 9), so they had the first phase. Their first squad deployed, on overwatch toward the German JOP. The forces were secret, so they had no idea we had mostly tanks, and we had no idea what AT support they had.
The South African light mortar came on behind them and put down a smoke round in front of the German JOP to try and block line of sight. A second South African squad deploys on the southern side of the arty truck, screening it from the German advance while a Senior Leader deploys and orders the truck to get a move on. It rolls forward 12 inches, kicking up a dust cloud in its wake.
Finally, the third South African squad comes on between the two others, though I don't seem to have gotten a photo of it this phase.
In the first German phase, we roll a double phase and waste no time bringing on two Panzer III's, one of them our platoon Senior Leader. You can just see them bathed in sunlight in the photo below. They come on either side of the mortar smoke, ignoring it.
The first tank fires both machine guns (no need for HE when the enemy has no cover). They kill a man from each team in the Saffer first squad, and wipe out the light mortar team.
South African Force Morale drops one point, to eight.
The command tank follows suite. It can't see the Bren team of the South African first squad, but kills two men from the rifle team and puts a shock on them.
Down south, our single infantry squad deploys, in their truck.
 |
| Pardon the desert sun |
In the second German phase, we only rolled four command dice (playing using the 'drop-die' method, where each successive phase gives you one less command die to roll), but still are able to advance the truck and dismount the squad. They are outside of the four-inch capture range of the ambulance, but cannot be seen by the South African infantry due to the smoke.
The panzers roll forward, kicking up dust as they fire their machine guns at the South African first squad again. The first tank kills a Bren crewman and puts two shock on the rifles, the command tank only manages a shock on the Bren team. However, this leaves that Saffer squad one shock shy of becoming pinned.
Just in case you thought the South Africans were doomed, they now manage to roll four phases in a row, even with the 'drop-die' rule.
Their boys AT rifle deploys and fires a shot at the command Pz. III, sending a magic bullet crashing through the transmission and knocking the tank out in a single shot. The crew escape as greasy black smoke pours from the wrecked machine, but it's quite a shock to the cocky Germans.
 |
| "Mein Gott!" |
Appropriately, the German Force Morale drops two points, to six.
Next, the South African second squad moves toward the ambulance, bursting through the thick black smoke at the double. They can now see the German infantry, but because they are green, at long range, and have another line of smoke between them and the target, there is no chance of them hitting anything.
 |
| They have a point of shock on each team, which was placed later. |
In the second Saffer phase, their second Senior Leader comes on and orders the Boys team to engage the other German tank.
"No bloody problem!" they say, shooting the track off the advancing panzer, immobilizing it with two shock.
 |
| One tank knocked out and another immobilized within minutes of beginning the attack... |
A tank immobilized is a morale hit, and the German Force Morale drops one point to five. Already, things seem to be turning against the Germans.
In the third South African phase they roll three command dice, which gives them enough to get the next phase and to have the second South African squad advance and fire on the German infantry by the ambulance. However, it has no effect.
In their last phase, the South Africans bring on their AT surprise, a 2-pounder gun which fires at the immobilized Pz. III, who manages to bounce the hit. I was expecting a 25-pounder fired over open sights, so I am mildly relieved, but with the AT fire so far being so successful, I know we still have plenty to worry about.
The Germans finally get a phase, but roll 66654 - double phase, end of turn, and a CoC point. We can't use the 4 because our Senior Leader, in the command tank, has already fled the field. So the mortar smoke clears, dust trails shorten three inches, and we go on.
At the start of turn two, the Germans still hold the phase, and we even manage to roll another double phase.
Our infantry advances on the ambulance. The driver of the ambulance raises their hands as a German in goggles and a scarf to keep the dust off shoves an MG-34 in his face - a sensible reaction. The other German team, with another MG-34, opens fire on the South African second squad, only firing at half effect, though the green troops are in the open. Regardless, they put a shock on each team.
 |
| You can just see the firefight over the ambulance across the table there |
In our third phase, that team fires again, this time at full effect, resulting in two men dead from each team and two shock on the Bren. The German infantrymen are outnumbered but never outgunned, and are cutting the South African reserve troops to pieces in the open terrain of the desert.
Back to the Soufricans, who fire the 2-pounder at the Pz. III again. The shell bounces, however. The Boys AT rifle is up next, and though they hit, the shot has no effect.
The South African Senior Leader orders the arty truck to move forward, speeding 11 inches through the desert. He moves up to stay in command range, and the third South African squad backs him up.
The Junior Leader with the South African second squad shifts a rifleman over to the Bren team to get them back to full firing effect, and they shoot at the Germans by the ambulance, killing one German rifleman.
The Germans reply by killing both the Bren gunner and his new assistant as well as putting two shock on the rifle team.
The loss of the Bren team drops South African force morale one point to seven.
A Panzer IV D enters on the eastern table edge, firing on the pesky 2-pounder with machine gun and high explosive, giving them two shock and wounding the gun's Junior Leader.
South African Force Morale holds steady, however.
The Germans have accumulated at full CoC die and could spend it to end the turn and capture the ambulance. We choose to bide our time, however, hoping to snatch another truck before the turn end and gain two, as well as wanting our infantry to reposition a bit before the ambulance vanishes off table.
In the South African phase, the fuel truck that has sat motionless all game roars to life, making a break for the table edge as the 2-pounder gives them covering fire, hitting the Pz. III again and forcing the crew to bail when they hit four points of shock.
The bailed panzer costs the Germans one point of Force Morale, bringing them down to four, meaning we lose a command die. Not good.
On top of this, the Saffers have a double phase, and the intact South African third squad moves up, presumably trying to screen the trucks from any more German infantry. The SL orders the arty truck to move forward, following alongside it and ordering the fuel truck to move again, bringing it within a few inches of escape.
 |
| The arty truck moves forward under command of the SL standing nearby, and the fuel truck zips toward the board edge past the Pz. IV. |
To make things worse, the South Africans have built up a Chain of Command die, which they burn to interrupt the start of the German phase and move the fuel truck to safety.
 |
| One of Marc's photos shows the fuel truck leaving the German armor in the dust. You also get a glimpse at the 2-pounder and Boys AT rifle that have been causing the Germans so much pain. |
The Germans were having a hard enough time balancing tanks and infantry control on five command dice, but now with only four and no SL left, we start to wonder if we can get our act together in time. The fuel truck was a major objective in my mind. After all, our tanks can't run on captured South African wounded from the ambulance.
We have our infantry squad detach a 2-man rifle team to capture the ambulance and prepare to move back to the truck. Before they go, the MG-34 team fires again at the South African rifles, wiping out that team and leaving just a Junior Leader and a Senior Leader.
 |
| The German troops prepare to reposition, but not before eradicating the South African infantry. Maybe they will need this ambulance after all. Marc's photo here. |
Despite this, Graham is rolling very well for the South African Force Morale rolls now, and they don't lose any.
In the South African phase, the arty truck advances again, veering away from the oncoming Pz. IV and heading for the table edge. The SL near the ambulance takes the JL with him and they fall back through the smoke.
The Germans can still see them, however, and in their phase a long-range shot from the MG-34 clips the fleeing Junior Leader, reducing his Command Initiative by one. Nice shooting, Goeff.
Of course, Graham rolls another 1, so there is no effect on the South African morale.
The Pz. IV rolls forward, using the abandoned Pz. III as cover and practically ramming into the arty truck. The 75mm cannon in the turret convinces the driver to put his hands up.
 |
| "Stop right there, Tommy!" |
The South Africans need to kill the tank to get their truck moving again, and a double phase will give them ample opportunity. The 2-pounder fires, and despite some shock and a target heavily obscured by dust and other vehicles, they hit. Luckily for the Germans, the shot pings harmlessly off the steel.
The Boys team is blocked by the advancing South African third squad and the immobilized Pz. III, so they move up, trying to get a shot.
In the second South African phase, the 2-pounder fires again but misses their target.
 |
| The South African gun line |
In their phase, the German infantry hop back in their truck, ready to zip off and capture the arty truck. Tanks can halt the South African vehicles, but it takes infantry to drive them away. I find myself wondering where the two bailed panzer crews have gone off to - they would be useful here!
The South Africans then turn their attention to the German troop truck, which they can just barely make out through the smoke of burning vehicles. The 2-pounder fires and misses. The Boys rifle hits, but has no effect on the truck. It just chips the paint.
The Germans don't get any dice they can use to activate units in their phase, but they have two CoC die saved up and use one of them to interrupt at the beginning of the next South African phase and move the truck 14 inches. It tears across the desert, putting two smoke trails between it and the South African gun line, making it impossible to see.
 |
One of Marc's photos shows the German infantry making a break for it.
|
Over the last few phases, the dust generated by the South African trucks has dissipated, leaving the South African SL in the open. He retreats toward the gun line, knowing he can't activate the arty truck anyway while it's covered by the panzer.
The 2-pounder fires at the Pz. IV but misses. The South African infantry advance and clear a line of fire for the Boys to shoot at the Pz. IV, though they also miss.
In the German phase, all they can do is move the truck up seven inches, looking for a place to dismount and make a run for the arty truck.
The South African Senior Leader pulls shock from the 2-pounder and has it fire, but can't seem to get them to hit the Pz. IV. The other SL, having escaped from his run-in with the Germans at the ambulance, has the Boys rifle fire - it hits the Pz. IV, but has no effect.
The intact South African third squad sprints toward the ambulance, hoping to recapture it from the Germans. They make 15 inches across the desert.
The Germans move the truck up further, getting it into cover behind the knocked out Pz. III. They also spend a CoC die to end the turn. The two German riflemen left behind with the ambulance clamber behind the wheel and drive it off the table, earning victory points for the Germans. Between turns, the dust clears.
 |
| "We'll be having this!" Another of Marc's photos. |
At the start of turn three, the South Africans are feeling a little on the back foot. The 2-pounder fires at the Pz. IV and the Boys fires at the truck, trying to knock them out but missing.
The South African third squad, seeing the ambulance snatched from under their noses, turns and spots the truck through the smoke. Firing at half effect, the Saffers are unable to damage the truck or kill any of the passengers.
The battered South African first squad, near the 2-pounder, goes on overwatch, watching the gap of open desert the truck will have to cross to get to the arty truck.
The Germans get a double phase next, but have no useful activation dice in the first phase. The second phase, however, sees the Opel Blitz truck shoot across the gap under fire from the Saffers, who only manage to put a shock on one of the MG-34 teams.
More importantly, the third Pz. III enters on the south table edge, firing on the rifle team of the Saffer third squad. In the open, they take two killed and five shock.
The Boys team fires at the Pz. III but has no effect. The 2-pounder can't spot the truck and so fires at the Pz. IV instead, but they miss.
The South African third squad, under fire from the Pz. III, focuses on shooting the truck, putting another two shock on the Germans inside.
After racing through South African gunfire, the panzer-schutzen dismount and commence threatening the drivers of the arty truck with their machine gun and bayonets.
 |
"Sorry we're late, but we'll take this one too!"
Another of Marc's photos, really captures the chaotic nature of this scenario, and of the historical fighting. |
All the Germans need to do now is end the turn and capture this truck before the South Africans can further reduce their morale - it's a race to build up CoC points now, and the Germans already have four of the six they need.
The South Africans fire at the dismounted Germans to no avail, but the 2-pounder swings around and engages the third Pz. III, knocking it out with a single shot. Ouch.
German Force Morale plummets two points to two, leaving the Germans with only three command dice each phase, which will make accumulating those precious CoC points harder.
In the German phase, they roll a double, meaning all they can do is fire off one rifle from the schutzen team, which misses.
In the next phase, the Germans use the Pz. IV to fire at the 2-pounder, now that the tank no longer has to cover the arty truck. The 2-pounder interrupts, however, hitting the Pz. IV, damaging its gunsight and putting a shock on.
Despite the -1 to-hit from the damaged gunsight, the German tank kills a crewman and puts two shock on the light AT gun.
 |
Unfortunately two of Marc's three cameras had died by this point, so I don't have a better picture of the action on this side late in the game.
|
In the South African phase, the 2-pounder fires again but misses. These are hard shots, usually at least an 8 or 9 on 2d6.
The Saffer third squad fires a few shots at the German infantry, giving them a shock. But with three shock on seven men, the Germans are still in very good shape to win the game, as long as the Pz. IV can keep bouncing 2-pounder shells.
The Germans get up to five CoC points in their next phase, just one away from the all-important CoC die. Perhaps the driver of the arty truck is putting up a struggle with the Germans trying to capture his vehicle under fire.
The Pz. IV fires at the 2-pounder, killing two crewmen and wounding the JL again, which kills him.
South African force morale finally gives, dropping one point to six. "It's all gone horribly wrong," Graham says at this point.
The South Africans have another phase in them, but it just brings misses against the Pz. IV from both 2-pounder and Boys rifle. The South Africans are battered and worn out.
In the next phase, the Germans get the CoC point they need and capture the truck at turn's end, leaving the battlefield under cover of the near-invulnerable Pz. IV.
After Action Report
This was a thrilling game. I thought it was going to go horribly for the South Africans, but they really held their own. In the end, the Germans earned 4 victory points for the captured arty and 2 for the ambulance. The fuel truck would have been 4 points for the Germans, but the South Africans only earned 2 for saving it. However, they knocked out three German tanks, giving them 1 VP apiece.
That makes it 6 VP for the Germans and 5 VP for the South Africans - a narrow victory for the men of 15. PD.
In campaign terms, this would have been a rough one. Historically, the Germans were scheduled to attack the South African main gun line on the afternoon of 23 November. It seems to me that the Germans simply can't afford to lose a full platoon of panzers before such a major attack, even for the capture of an artillery gun and an ambulance.
This game, and the Virtual Lard experience as a whole, is lots of fun, and I look forward to future virtual games when possible. Another huge thanks to Marc for hosting, the other three players for making things interesting, and the VL5 organizers.


Thanks for playing, and I'm glad you had fun! This one certainly felt like a see-saw - the South Africans seemed on the back foot early, but the loss of that 3rd Pz III and crashing their Force Morale down to 2 was brutal. Had the saffers gotten a penetrating hit on that Pz IV, things might have ended very differently! Definitely a nail-biter down to the finish.
ReplyDeleteIt was definitely exciting. Thanks again for putting on such a great game. I look forward to checking out the rest of PSC sometime soon
DeleteThanks for the report, sounds like another great CoC game.
ReplyDeleteGlad you enjoyed, Doug. This was a particularly excellent game.
Delete