Chain of Command in Stalingrad - Game 1

--
September 1942, Stalingrad, USSR
Serzhant Volkov lifted his head slowly, peering over a crumbling wall toward the low-slung grey factory building, its blackened smoke stacks spearing the broken skyline.
“I can see them moving around in there,” he said quietly, to no one in particular.
Most of his men, hugging the broken rubble of the bombed-out worker’s settlement, said nothing, didn’t even glance over at him. Off to Volkov’s right, one of the Soviet submachine gunners stiffened.
“Fascists in the factory, comrade serzhant. Across the street.”
Volkov turned his head, his body slouching further behind the wall in self defense without his brain realizing why. The seasoned NCO could see the first few German helmets poking above the ruins of the factory across the street, where the former residents of the dorms his men defended used to spend their days, before German bombs and artillery tore them to bits.
“Stay low, check your weapons,” Volkov instructed his men, his gloved hand patting the drum magazine of his PPSH.
--
 |
| The battlefield viewed from the Soviet side. Key features are the multi-story apartment building with the green roof in the center of the table, the light grey factory building across the street from it, and the cluster of worker's buildings in the lower right corner. |
My opponent commanded a three-squad regular rated German rifle platoon with special rules allowing him to roll for force morale as if his troops were elites and giving him a pool of five additional command dice he could use one of on any given phase to give his platoon a boost to their activation chances. This represents the highly trained men of 24th and 16th Panzer Divisions and other veteran German units around Stalingrad without resorting to CoC’s panzergrenadier platoon, which is bristling with machineguns and difficult to counter effectively. His support list is taken from the Operation Winter Storm Pint Sized Campaign.
I will be commanding a 3-squad regular rated Soviet tank rider platoon from the core rulebook. These are small squads with a submachinegun-toting Junior Leader, a two-man LMG team, and four submachine gunners. Deadly up close, but fragile. My support list was also from the Winter Storm book.
My opponent started at 11 Force Morale, the maximum, and I had nine.
We played the Attack and Defend scenario from the CoC core rulebook. The Germans got a whopping five free moves in the patrol phase, which let them rush up to my patrol markers, which were 18 inches from my edge, and lock them quickly. I maintained a forward Jump Off Point in the apartment complex, but was mostly pushed back into the rubbled building behind the apartment block and a cluster of ruined buildings in my lower left table corner that we identified as a worker’s settlement for the nearby factory.
 |
| A rather poor photo that shows most of the JOPs - The Soviets have one in the second floor of the center apartment, one in the ruins left of the apartment, and one just off screen in the worker's settlement in the bottom right. The Germans have one in the factory ruins on the right side of the photo, one behind the light grey factory building, and one off screen to the left, on a street sheltered by a ruined building. |
The Germans started with 10 support points, and I had 14. This was a major rules error on my part - I got greedy and forgot to halve the support dice roll. I should have had 9. A big difference. Perhaps Comrade Stalin was simply smiling on my platoon that day.
 |
| “Oh, you’re such a cheater! You can’t fool Papa Koulikov. No no no no...” |
Either way, I selected a minefield for one point, a M1910 Maxim MMG for three points, an additional SMG squad for four points, and a rather nice KV1-E for six points.
 |
| Laying down a minefield in the street (and apparently some nice ornamental grass with it). |
The Germans had a pregame barrage for two points, a satchel charge for for point, a Panzer III Ausf. J for five points, and (presumably, I never checked for sure) spent their remaining two points giving two of their squads two additional SMGs each. EDITOR’S NOTE: I realized later than my opponent added two men with SMGs to two of his squads instead of simply replacing two rifles in these squads with SMGs. So we both made mistakes with support.
The Germans kicked things off with a double phase, placing a squad in the factory building across from my JOP in the worker’s settlement and a second squad in the 1-story grey factory building across the street from the central apartment complex. In the second phase, the German Oberfeldwebel (platoon sergeant, a Senior Leader) deployed and took the German first squad dashing across the street with him toward the worker’s settlement. There was some brief confusion about movement distances (remember your dice rolls, people!), but they failed to make it to my JOP to lock it down, taking cover behind a damaged wall.
 |
| A German squad dashes from the shelter of the factory toward the Soviet JOP in the worker's settlement. |
 |
| A second German squad sets up on overwatch in the light grey factory building, keeping an eye on the Soviet center. |
In the meantime, on the other side of the table, the German third squad deployed along the edge of a ruined building, their light machine gun placed on overwatch across the plaza toward Soviet positions.
 |
| Another squad of fascists creeps down an alleyway on the Soviet left flank. |
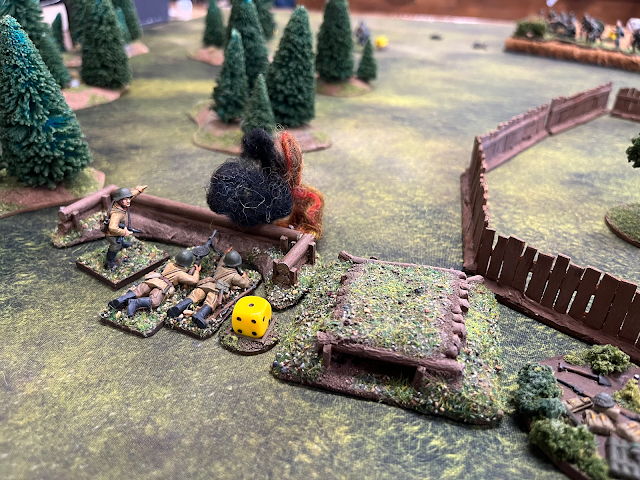
The Germans would pay dearly for their advance. I immediately rolled a double phase and deployed my first squad to protect my JOP in the worker’s settlement. They let rip with five SMGs and an LMG at less than six inches - 26 dice worth of firepower. The result was a point of shock on the German LMG team, three men dead, and the Oberfeldwebel taken out of action for the turn, perhaps knocked unconscious by a ricochet or nursing a more serious wound, dazed by the flurry of Soviet bullets. The Soviet JL followed the volley with a grenade, but it fell short and exploded harmlessly.
 |
| Surprise, Fritz! |
The wounded SL caused German force morale to drop by one point, to 10. I was already having an effect on the hardened panzergrenadiers.
With my second phase, I activated that squad again, letting loose another volley, putting two shock on the rifle team and another on the LMG team. This time it was the German squad leader’s turn to hit the floor, injured in the same way as his SL the phase before. The leaderless German squad took cover as another Soviet grenade exploded without causing them any further harm.
 |
| More German blood shed at the worker's settlement. The figures knocked over are leaders taken out of commission for a full turn due to their wounds. |
German Force Morale dropped another point, to 9. Our FM was even now.
Concerned that my central JOPs were unprotected, I deployed a Maxim MMG in the upper floor of a rubbled building facing left. I placed it back from the front windows, not wanting to take fire from the German second squad overwatching across the street in the grey factory. I also elected not to fire at the third squad’s LMG team, yet. They were in hard cover and on overwatch. My intent, for now, was merely to threaten any rapid advances on my weak left flank.
 |
| A Maxim sets up and prepares to fire at the Germans skulking around the Soviet left flank. |
When it was the German’s phase again, the battered squad assaulting the worker’s settlement returned fire, dropping two points of shock on my brave Soviets.
In my center, the German second squad stormed the apartment building, their platoon Leutnant urging them to charge across the street and up the rubble slope into the apartment, successfully shutting down my JOP in the building.
 |
| The Germans make a bold dash for the strong defensive position provided by the central apartment block. |
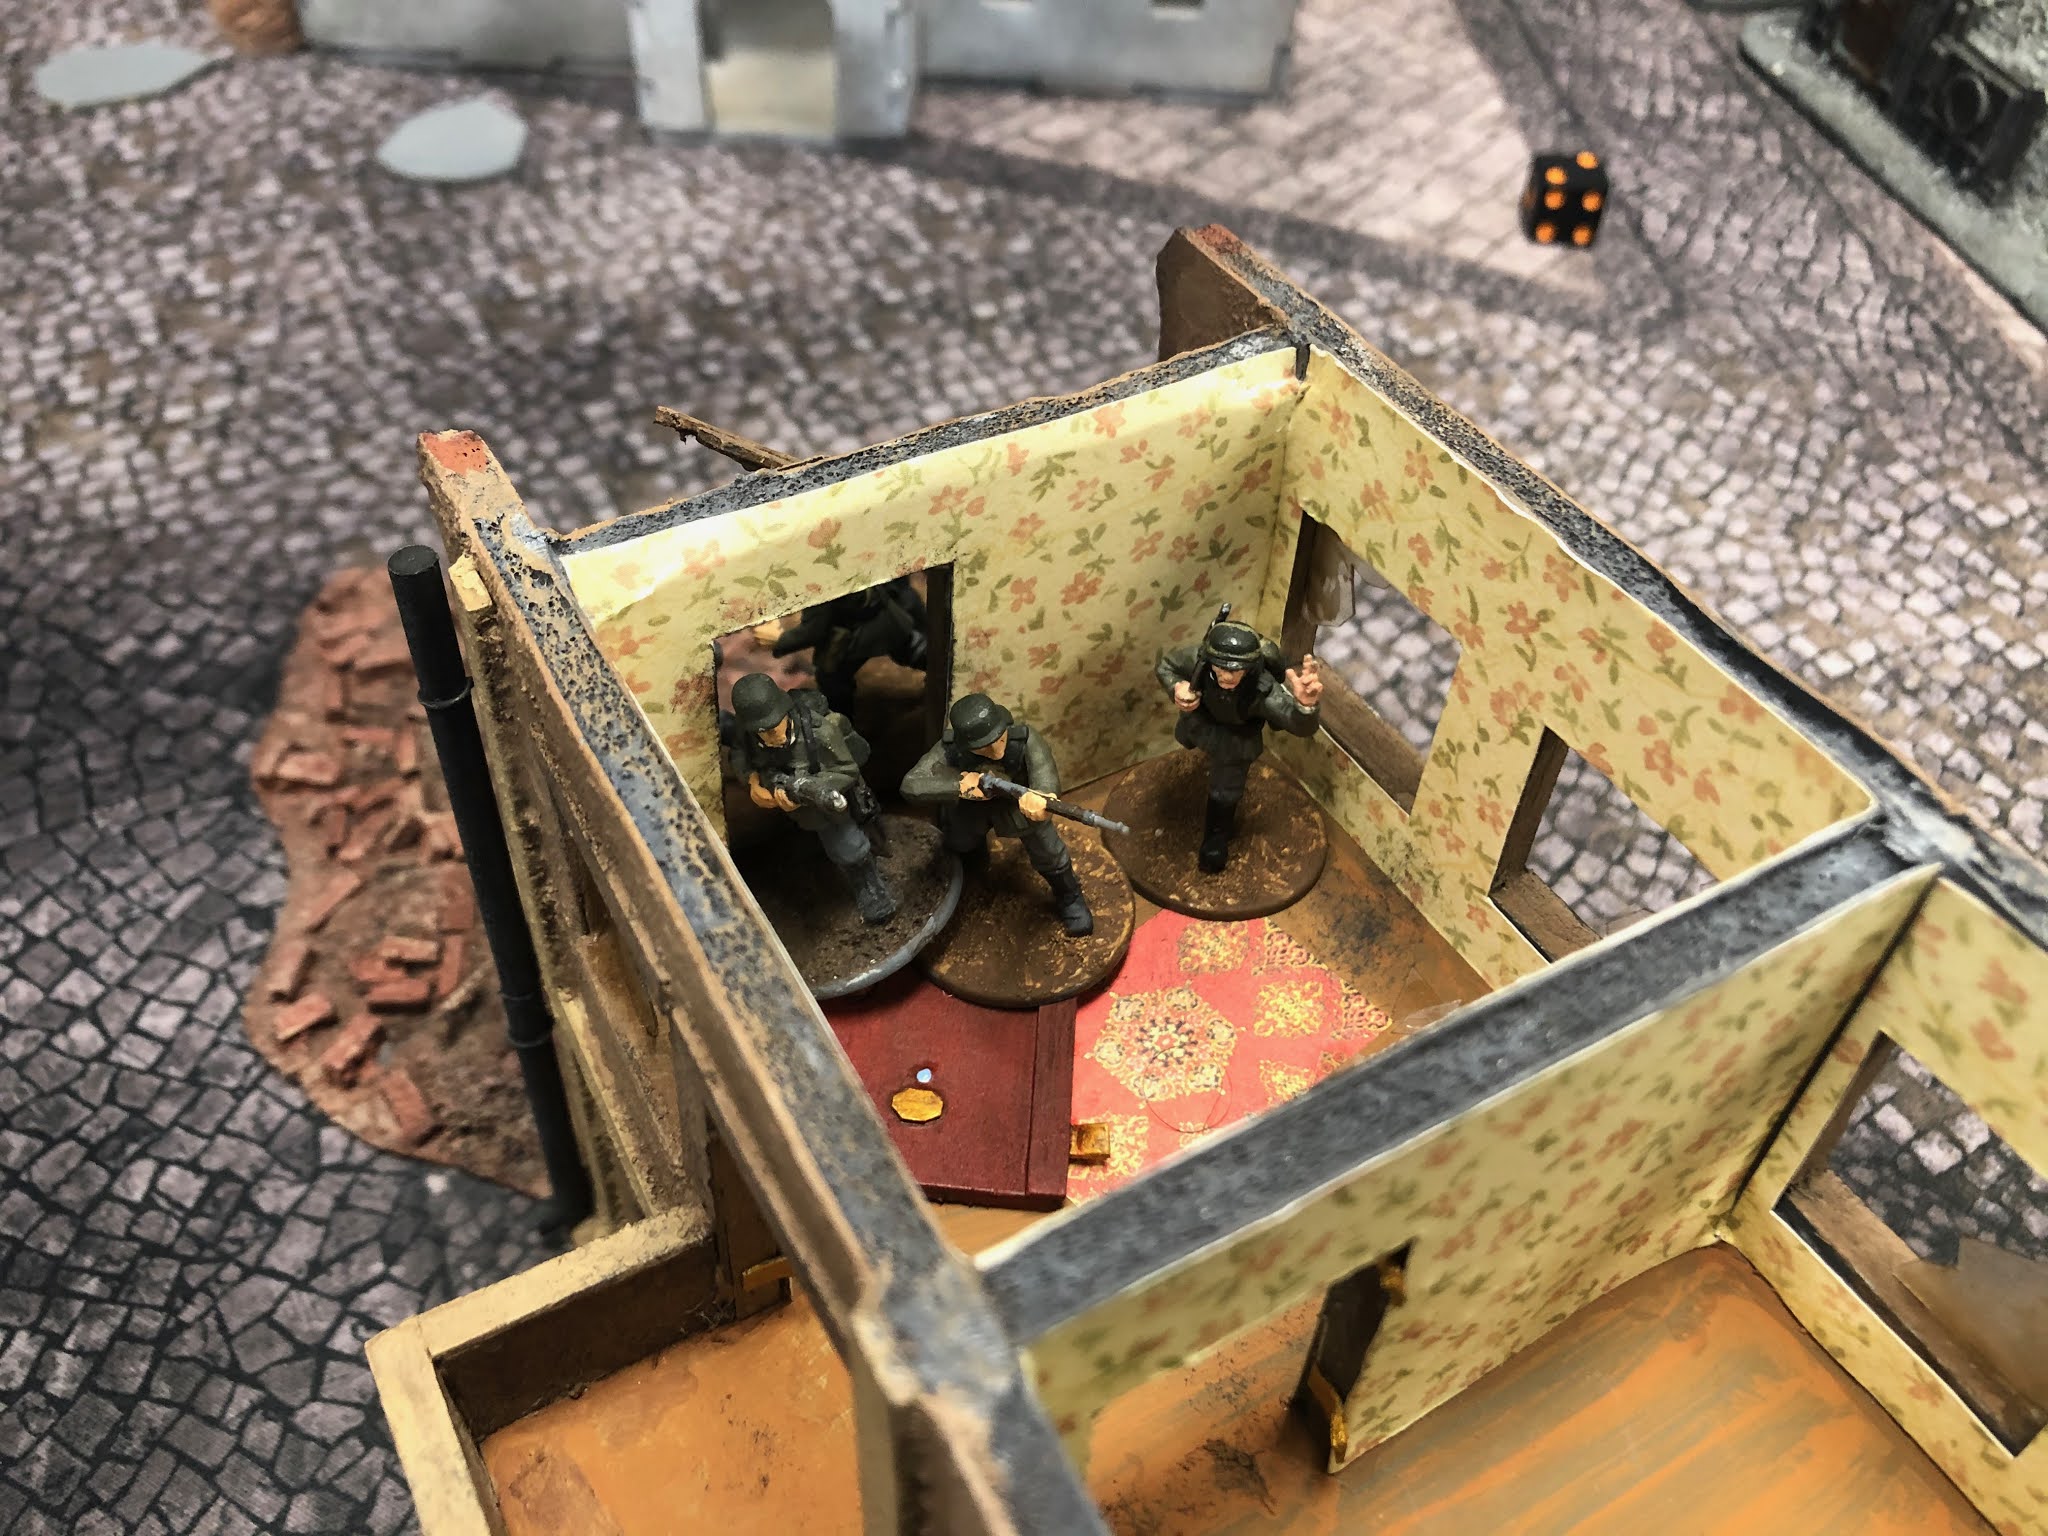 |
| They kick in the door and track mud all over the rug! |
Not amused by my defensive posturing, the German third squad LMG fired from the alleyway at my Maxim, killing one of the five crew members.
In the next phase my Maxim returned fire, managing only one point of shock from 10 shots and eight hits. Clearly some fool broke the gunsight while they were hauling the weapon upstairs into position.
 |
| The Maxim attempts to avenge their deceased crewman, but only put one point of shock on the German third squad. |
My first squad, in the worker’s settlement, had better luck - killing three fascist riflemen and a member of the LMG team. Along with a point of shock for good measure, which pinned the German assault squad, preventing them from moving and cutting their number of firepower dice in half. About this time I noticed that squad was bristling with MP-40s and captured PPShs - the extra SMGs my opponent purchased.
 |
| Things looking grim for the pinned German first squad, their assault on the worker's settlement bogged down with heavy casualties. |
Thinking fast, the German Leutnant opened the next phase by ordering the Junior Leader from the second squad to take his six-man rifle team across the street to lock my left-most JOP, preventing me from deploying infantry anywhere except for the worker’s village on my far right flank.
 |
| The German rifle team picks through the rubble to capture the Soviet JOP, under the nose of the Maxim crew, who seem not to notice anything amiss. |
Meanwhile, he ordered the second squad’s LMG team deeper into the apartment block, clearing it out and firing at half effect at the unprotected rear of my Maxim team, earning one hit that killed another crew member.
 |
| A German LMG team draws a bead on the Maxim crew, shooting them in the back. Cowards! |
The Maxim team takes more fire from the German third squad’s MG34 as well, killing another crewman and putting a point of shock on the remaining two gunners. The German LMG seems to be winning the firepower duel on the Soviet left flank.
To make matters worse, at this time a Panzer III J rolls down the street, firing at my first squad in the worker’s settlement with machine guns and high explosive shells.

This dumps five shock on my SMG squad in rapid succession and knocks their daring leader down, preventing him from continuing to direct fire on the pinned German first squad.
 |
| A Soviet serzhant taken out of action, and his small squad has more and more shock. |
Despite the setback, my force morale holds steady. Perhaps the men are convinced that their serzhant will make a speedy recovery, or perhaps they just don’t like him much.
At the start of my next phase, I’m in a very tight spot. I’m inflicting heavy casualties in the fierce fighting for the worker’s settlement, but now that squad is suppressed and temporarily leaderless. My two other JOPs are closed off by enemy troops, preventing me from deploying, and I can’t roll any 1’s or 3’s on my command dice that would allow my to react with the Maxim team or bring in my KV1 to stabilize the situation in the center. My only saving grace is that I have had almost no trouble getting my men through the German pre-game barrage. Perhaps they’re numb to the shelling by now.
Despite their wounded leader, the Soviet first squad acts on their own initiative to fire again at the pinned Germans. With a valiant cry that no fascists will take the workers’ quarters, they put a few more holes in the wounded German squad leader. This time it’s a minor wound that reduces his Command Initiative - how many orders he can issue in one activation. For good measure, they also put a shock on the LMG team.
The fresh wound on the JL drops German force morale one point to eight.
I deploy a fresh SMG squad into the worker’s settlement to relieve the first squad and finish off the dastardly Fritzes. They rush from cover, firing their weapons in full automatic and brandishing melee weapons in case the Germans consider sticking around. They don’t consider it.
 |
| A fresh Soviet SMG squad rushes into action, preying on the weakened German first squad and breaking them. |
The second Soviet squad put one more shock on the LMG team and three more on the rifles, who also take one man killed. The squad breaks, but not before the unconscious SL takes another wound - a minor wound that reduces his CI by one.
 |
| The Germans flee back toward the factory, carrying their wounded leaders with them. |
The effect of the squad breaking drops German morale by two points, and the effect of the wounded Oberfeldwebel drops it by two more, swiftly halving the German morale and leaving them at four. My center is still a mess, but I’m starting to feel more secure in holding my ground.
In reply, the German player moves his LMG team in the central apartment onto my JOP, preparing to capture it if the turn ends, which could cost me morale. These men fire at half effect toward my Maxim again, but the one hit has no effect on my brave machine gunners.
Under the suppressing fire of their MG34, the riflemen of the German second squad rushed up the stairs and attacked my Maxim team in close combat from behind. My brave machine gunners are bayoneted without inflicting a single casualty on the Germans in return.
 |
| The Germans go in with the bayonet. |
In response, my force morale drops by one point, to eight.
With the machine-gun nest cleared, the German third squad rushes across the street on my far left flank, putting more pressure on that side to make up for the failed assault on the workers settlement, where the Pz. III is shooting at my SMG gunners - to no effect, this time.
 |
| The German third squad dashes across the street, seeking cover in the rubble on the Soviet extreme left flank. However, it’s just at this moment that my heavy armor clanks down the street and onto the table. Instead of trying to duel the panzer across the table, I direct it toward the rifle team that just killed my Maxim gun. A 76mm HE shell and a burst of machine gun fire catch them in the open, killing one man, putting a point of shock on the team, and wounding the aggressive Obergefreiter leading their bayonet charge. He loses one CI, but German morale is not affected. |

On the Soviet right, the fresh squad gives chase, moving to the edge of the worker’s village and firing at the broken Germans in the street. They wipe out the LMG team and put three points of shock on the rifle team.

The demise of the LMG team reduces German morale by another point, to three, costing the German player one of his precious command dice. This will make the remaining squads more difficult to command.
Finally, at the end of my phase, another squad slips out the back of the worker’s settlement. Their DP-27 LMG is on overwatch down the street as the submachine gunners prepare to assault the central apartment building.
 |
| The Soviet third squad prepares to retake the central apartment block from the Germans, with the LMG carefully covering their approach. |
The German third squad rushes through the broken building toward my KV1, making me suspect they are packing a satchel charge, although I don’t learn the exact support my enemy purchased until after the game.
 |
| German troops running toward a KV-1? What could they be up to? |
Deciding not to face the KV1, the assaulting German rifle team retreats, abandoning my leftmost JOP and heading back for the cover of the apartment building. Unfortunately, the eagle-eyed LMG gunner from my third squad is on overwatch. Although the others in the SMG squad are out of range, his DP-27 spits lead down the narrow street, hitting the wounded German NCO as they cross the street in the open. He suffers another wound, which kills him.
 |
| The LMG from the Soviet third squad opens up on the Germans in the distance, raking them with fire as they try to retreat to the safety of the apartment. |
With their squad leader killed, the rifle team succumbs to their shock and is pinned in the rubble of the street.
 |
| The Germans had rolled well enough to move into cover on the other side of that rubble, but the overwatch fire caught them in the street, killing their JL and pinning them in a tight spot. |
The swift accurate fire from my machine gunner costs the Germans one more point of morale, dropping them to two. Based on the rules of the scenario, the Germans would lose hope and break off their attack, but as this is a one-off game, the German player elects to keep fighting. I realized later that he wanted to try and plant the satchel charge on my KV1. A bold move, but perhaps unwise.
The KV1 pursues the pinned German riflemen, crashing through the rubble and firing hull and coaxial machine guns, killing two more men.
 |
| Germans fleeing in terror from the KV-1 - this is how it's supposed to work! |
The Soviets have their blood up now, and I deploy a support squad forward from my newly-liberated JOP. My men charge forward with cries of “URRAAAA!” and “Death to the fascists!”, immediately getting into close combat with the Germans.
 |
| "No mercy for fascists, comrades!" |
Because the odds are (significantly) greater than 4:1 in favor of the Soviets, the German riflemen automatically flee the combat, taking eight more points of shock as they go. This leaves the three riflemen with 13 shock, more than enough to break them and send them scurrying back to the fatherland - or at least their edge of the board.
 |
| This could be the most shock I've ever seen on a single team in CoC. |
The violent counterattack drives German force morale down to a single point, effectively hamstringing the German commander.
As a final blow, my platoon Leytenant finally makes an appearance, in the midst of the valiant submachine gunners in the worker’s dorms on my right flank. He rallies the first squad, with their NCO still wounded, and orders the other squad to exact vengeance on the broken Germans in the street.
 |
| The Soviet platoon commander appears, urging his men onward to victory. |
 |
| That's five dead Germans. |
After Action Report
Despite the dire situation in the center, my sluggishness to deploy troops actually saved lives. I lost five men killed from the support Maxim team, but none from my core platoon other than a wounded junior leader.
The Germans suffered more sharply, with one 12-man squad (should have been 10 men) simply eradicated in the assault on the worker’s settlement, where his Oberfeldwebel was also gunned down in the street. The central German squad also lost their NCO and three riflemen, bringing the total to 15 enlisted men killed, two dead JLs, and one dead SL.
My opponent is more used to playing Chinese and Japanese forces that move fast and have overwhelming numbers, and I think his aggression served him well in the early phases of the battle, when I was certain he would shatter my center. A turn end would have ruined me if he was able to remove my two captured JOPs from the table. He should not have rushed his first squad so rapidly toward my rightmost JOP and into the teeth of my SMG squad, but in his defense he came dangerously close to capturing that JOP as well and ending the game in just a few phases.
I played very high-risk with my late deployment strategy in the center, and I don’t think I could have pulled out a win without the arrival of the KV-1 (another reason that it’s important to note my error in support points, although I would have had enough for the KV1 either way). My first and second squads performed admirably in the worker’s settlement, dishing out punishment to the attacking Germans. The SMGs really did wonders in such close quarters, and the LMG gunner from my third squad really delivered with that overwatch shot picking off a German squad leader. With everything else? I think I just got lucky. But sometimes that’s all you need, isn’t it?
We played another game that day on the same table, which you can read here.
Where did you get the wallpaper for the houses from?
ReplyDeleteIt's printed paper made for scrapbooking. I just searched around for suitable designs that would look okay at that scale. Cut to size and stuck on with PVA glue. Most craft stores have some type of it. You could also definitely just print designs on regular white paper, I think.
DeleteThank you!
DeleteGreat report, thoroughly enjoyed it.
ReplyDeleteThanks, your blog was a big inspiration for mine, so it means a lot
Delete