Virtual Lard 6: The Battle of Hughie's Wee Garage

This past weekendA month ago (yikes!), I was lucky enough to join not one but two games of Chain of Command during Virtual Lard 6. Interestingly, both of them involved the proposed German invasion of the British Isles - one during Fall Grün, the invasion of Ireland, and Unternehmen Seelöwe, the invasion of England.
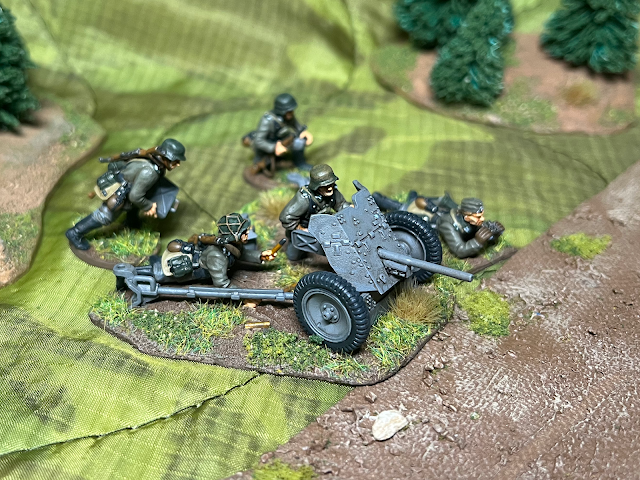
This battle report will cover the first game, pitting the Irish Army against German motorized troops. I was playing Germans alongside Brendan, and we had a 3-squad rifle platoon with two Senior Leaders, a light mortar team, a tripod MG-34, and two armored cars: a 221 and a 222. I had nominal control over the armored cars and the support teams, but as we shared 5 command dice, we had to work together.


As this game was played virtually and it was harder to get detailed photos, I don't intend to offer a play-by-play like some of my other battle reports. Hopefully it's still enjoyable.
The German objective is to capture the garage on the edge of town and secure the fuel there to continue the advance. One of the reasons the invasion of Ireland never happened during the war is because the plans were... optimistic, to say the least, involving German troops securing their own fuel from civilian sources as they advanced.
 Both sides ended up with Force Morale 8, but the Irish troops were rated as green, aside from their support units. They do have the advantage of defending mostly hard cover in the town, but we still needed to move fast to capture the garage in the top corner of the map. Getting four free patrol moves helped greatly, and we were able to play an aggressive patrol phase that pinned the Irish JOPs into the buildings around the garage. The flag markers below marked the final JOPs.


The 221 comes on, racing up the road and coming up against an Irish 18-pounder field gun in the walled back garden of the house at the end of the road. They miss their first shot, but the German MG on overwatch manages to wound the gun's Junior Leader, dropping the Irish Force Morale 2 points, to 6, in only the second phase of the game.


However, the Germans have fired past a flock of sheep belonging to Mad Morris, a surly shepherd who serves as a sniper for the Irish. He wastes no time picking off a man from the German MG-34 crew.
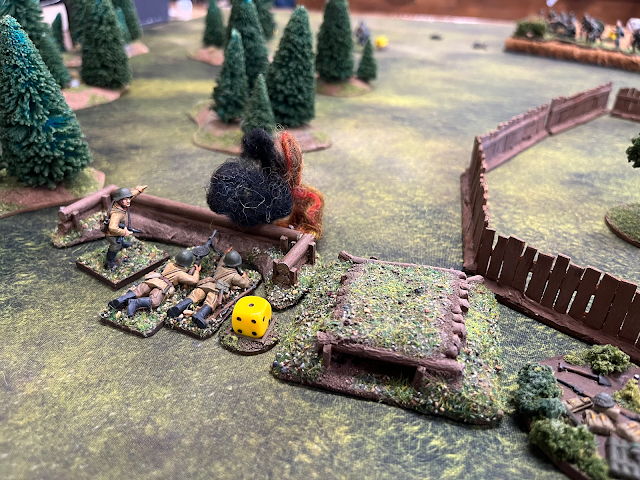
The third German squad deploys behind the railway embankment on the right, pouring more fire on the Irish squad.


The German bring on their 222, but it can't fire its autocannon past the 221, and fire from the coaxial MG has no effect. The Germans manage to wipe out the first Irish squad, which drops Irish FM by one point to 5, although wounding the JL has no further effect.


In the next phase, a shell from the 18-pounder forces the shocked 221 crew to reverse. As they do, they may spot through the hail of bullets an Irish Rolls Royce armored car coming down the road, firing at the German infantry.


The 222 rolls up even with the 221, but can't spot the Rolls Royce, so it fires at the Irish gun. The wall and gun shield keep them safe, however.

It's not all one-sided, though. The Irish finally manage to wipe out the LMG team from the German squad on their right. Much to the anger of the Irish players, however, the Germans again avoid a morale loss.

The German light mortar comes on by the railway tracks, and with its first shot blows the JL of the Irish gun to smithereens. That untimely death drops the Irish FM by two points, to 3. We start to think we might have the Irish on the ropes.
Furthermore, German fire breaks the second Irish squad. The Irish employ their Backs to the Wall special rule, and a good roll allows them to avoid taking a FM loss.

Despite the sad fates of the other squads there, a third Irish squad comes on right in front of the shepherd's cottage and manages to break the weakened German squad. German FM drops one point to 6.

The 222 finally manages a shot at the Rolls Royce, but is only able to get their attention. The Irish armored car only has a machine gun, however, so the 222 faces little threat.

The German MMG fails to come on, and other fire in that phase is a little underwhelming.
The Irish, clearly growing desperate, turn their Vickers gun on the fleeing Germans from the first squad. They kill the Junior Leader, dropping German FM two points to 4.

If that wasn't enough, Mad Morris, the Irish sniper, wounds the JL of another squad, causing a further FM drop, to 3. In just one phase, the Irish have hauled German Force Morale down to match theirs.
The German retaliation isn't exactly what it needs to be. They manage to pin the 18-pounder crew, and the 222 scores a critical hit on the Rolls Royce! But the Irish vehicle keeps on kicking, with no serious damage.

In the meantime, the Irish Vickers crew is on the move, coming around the cottage to get a better shot at the Germans. The Irish fire is still hot, causing shock and casualties. This has developed into a nasty and desperate fight.

In a double phase, the Germans try and repay the Irish for picking off their fleeing men by targeting the remains of the broken Irish second section as they run toward the garage. The section is wiped out, and the JL is wounded.

Using their scenario rule, this time on a more difficult dice roll, the Irish avoid taking a FM roll for the wiped section, and the wounded JL does not affect their morale.
With only three command dice to roll, the Germans are having trouble keeping up the fire - something the Irish have been struggling with for most of the game now, also at three dice. The Germans try and finish off the fleeing JL, but they can't hit him.

The firefight drags on for a few more phases, until the Irish Senior Leader manages to focus the fire of the third and final squad with the withering fire of the Vickers MMG. The fusillade shreds the German squad in the center, wiping out a team and wounding the platoon Luetnant. The toll on Force Morale is too much, and with only 1 FM, the Germans are forced to withdraw, defeated.
---
This was an incredibly entertaining game, incredibly back-and-forth. I think the Irish players felt very outmatched at the beginning, and rightly so. But a combination of scenario special rules and good rolling let them win the day, narrowly. I think the fight would have ended sooner without the Irish morale special rule, but it added to the scenario and gave them a fighting chance. As the Germans, we failed to build a proper base of fire under the command of either of the Senior Leaders, instead relying on the individual firepower of squads. That's still formidable, but if we had gotten the SL on the railway track to coordinate a squad, the mortar, and the MMG all in one turn using one command die, we would have given the Irish a lot more to think about. Our plan and our maneuvering was really sound, but we let the unexpected ferociousness of the Irish defense unbalance our push. Without overwhelming firepower, we fell victim to the luck of the dice, which let the Irish avoid FM rolls and pick off our leaders.
Expect a report on the second VL6 game relatively soon!
Great AAR. I played in the second game of this very entertaining scenario at VL6 as an Irish commander and we lost (finally and just).
ReplyDelete